Tuesday, July 5, 2022

Review: Adventure Spec Supershirt

Another type of tail tidy...

If you've been following up-and-coming UK ADV gear company Adventure Spec, you'll be aware that for the past two years they've been developing an armoured shirt to meets Europe's stringent AA standard for motorcycle protective gear. Last year, Adventure Spec revealed their development program and offered early adopters a chance to get one of the first production items. I immediately plunked down a buck to hold a place in the pre-order line. Today, after a year of development delays and then a website ordering demand that appeared to have set servers on fire, I finally was able to purchase and receive one of only 48 or so "Supershirts" allocated to North American customers. While I haven't had a chance to ride in the shirt yet, here are some initial observations that may help you determine if this is the right gear for you when the Supershirt is officially launched and inventory becomes available later this summer.

For reference, I'm 183 cm tall (6'-1") and 91 kg (200 lbs) of generally athletic build, but carrying a bit more middle than usual. My chest is 107 cm (42") and waist about 88 cm (34"-35") depending on pants and how many tacos I've just eaten. For most riding gear I seem to fit a Large, so that's the size of Supershirt I ordered. It fits perfectly: snug but not uncomfortably tight, with perfect sleeve length to slot my thumbs in the holes and not have wither bunched fabric or numb thumbs.


Adventure-Spec does not seem to have listed technical details of the Supershirt on their web site, and I'll leave it to them to do that. Here I'll only cover my observations and first impressions.


The first thing I noticed is the surprising weight of the shirt. Mine weighs 1710g in Large, although the tag indicates 1670g. The material is tough and stretchy, and a little coarse. It appears to be two types of fibre woven together with the outer face material (which is dark gray to almost black) probably an aramid abrasion material and the inner layer (light gray) being more of a comfort/structural layer. It is not a mesh structure: you can barely see light through it and only if the light is bright and you stretch the material. 


Given the roughness of the weave, it should allow sweat to escape reasonably well. Wearing the shirt with a 150-weight Merino wool T-shirt on underneath, I found it warm but not uncomfortable in my workshop's ambient temperature of 24C with high humidity (it was raining). I didn't find the inner material to be uncomfortable or grabby on my hairy arms. 

The Forcefield armour is all Level 2 and substantially thicker than the Level 1 armour in my 2018 Klim Carlsbad jacket. When putting on the Supershirt, I find I snag my fingers on the pockets inside the sleeves that hold the armour. One solution would be to add some Velcro to hold the pockets closed (and reduce the risk of tearing them) but for now the snagging just feels like a minor annoyance that I can avoid with practice. 

The back armour does not extend to the lumbar region and I immediately noticed this when I first put on the Supershirt. It felt much shorter than the D3O armour in my Klim jacket, but measuring proved me wrong. However, it is significantly shorter than the back armour in my AlpineStars armoured shirt shown in the pic below (more on this shortly).

Back protector is about 16.5" long.

The AlpineStars back protector extends over the lumbar region. 

The AlpineStars jacket/shirt makes an interesting comparison to the Supershirt because like the Supershirt, it has back, shoulder, elbow, and chest protection--as well as a kidney belt. However, it is clearly not designed to be worn as an outer layer and I've mainly used it under my Klim jacket or a Klim Pro jersey which is tougher than a regular jersey. The AlpineStars mesh has proven to be quite fragile under normal wear. It's torn just putting on the garment, so I've been reluctant to wash it.

The AlpineStars mesh is fragile and the armour isn't removable. 

Here's the Supershirt's Forcefield armour compared with the Klim D3O.


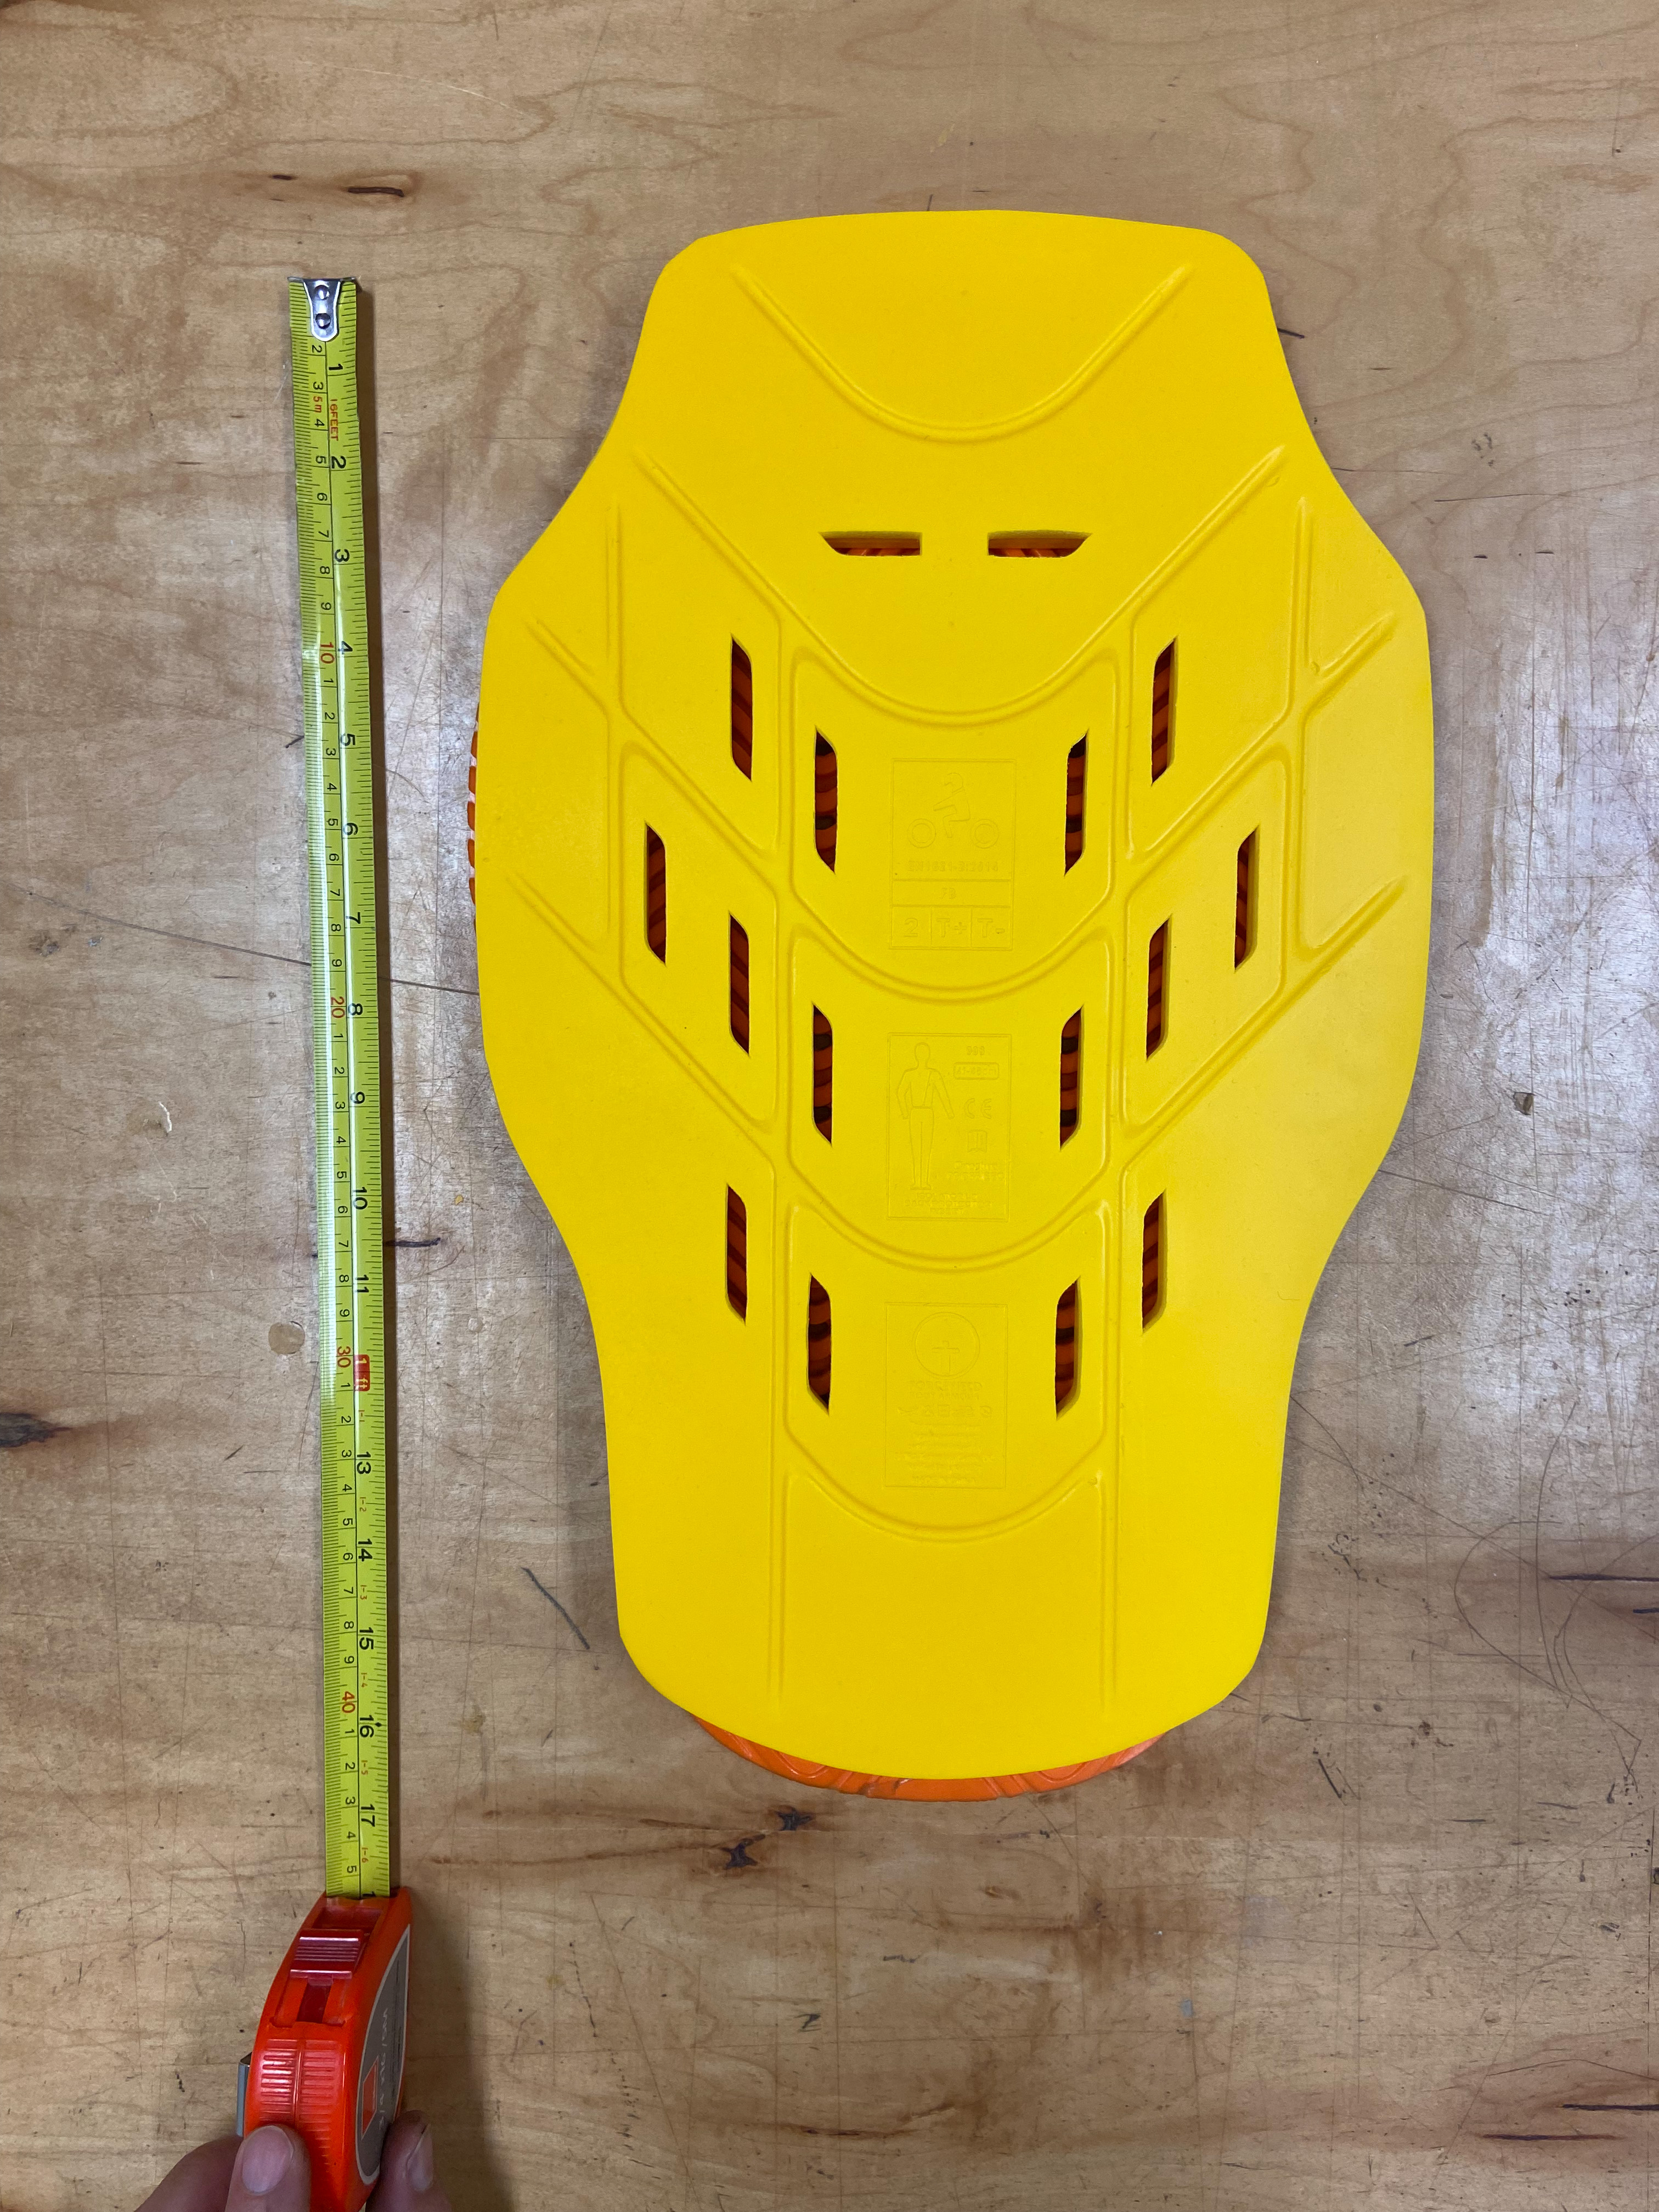
The back protectors are almost identical in shape and size.

The Forcefield is about twice as thick as the D3O, as needed to get that Level 2 protection (versus the Level 1 of the D3O). 


While the back, elbows, and shoulders all use the same yellow armour, the chest uses three layers of black material bonded together in the centre. 


All of the armour feels like the type that hardens under impact. I imagine it'll conform nicely to my anatomy once it's warm and I've worn the shirt for a while. 

The elbow and shoulder protectors are also similar to those in my Klim jacket, although twice as thick and Level 2 versus the Klim D3O's Level 1. 


Here's how the Supershirt fits with just the light T-shirt on underneath. (Where'd that belly come from?!) On a hot day, I'd probably ditch the T-shirt because the Supershirt is going to get sweaty anyway, so why create more laundry?


The Supershirt fits under my Klim Carlsbad jacket (size Large; armour removed) just fine, and I didn't feel that mobility was too restricted. I don't know how the current CE-rated Klim Carlsbad compares, but I would think that its improved forearm design helps mobility. I never really liked how the forearm zips work on my 2018 jacket: they're impossible to zip up without stopping my ride and removing my gloves so I can hold the ends of the jacket sleeves. Won't need to bother with that when wearing the Supershirt!


The Klim jacket with armour removed weighs 1310g. Adventure Spec offers their "Singletrack" waterproof jacket which weighs 710g. While I agree with Adventure Spec's philosophy of "light is right", the combination of Supershirt and Singletrack jacket weighs 2412g compared to 2010g for the Klim Carlsbad with armour in. Of course, with the Adventure Spec combo you're getting certified Level 2, AA protection (versus Level 1 for the Carlsbad) as well as a chest protector. The additional protection comes with a weight penalty. I think the main advantage of the Supershirt in this case is you don't need the jacket: the shirt alone serves as the outer layer. So really, you're comparing a lighter, breathable (but not waterproof) protective layer with a waterproof (but not breathable) and heavier jacket. 

While the Supershirt should be great for hot-season riding, what about shoulder seasons or cold days when you need heated gear? Here's my First Gear 90W heated jacket over the Supershirt. No significant mobility issues. 


Of course, it's unlikely I'd wear just the heated jacket over top (although that's an interesting idea to test). So here's the whole shebang layered with the Klim on top. 


This made me feel more like a sausage and my forearms were noticeably less comfortable. But it does work, and usually when it's cold and wet for me (like 10 hours of rain at 8C) it's because I'm stuck on a long highway run and not trying to navigate technical trails where more mobility is required.

To meet AA protection requirements, the Suupershirt sleeves require thumb loops. No discomfort using them inside my Held Steve gloves (size 9.5 Long, by the way--fantastic gloves).


One thing that doesn't seem to work with the Supershirt is my Atlas neck brace. I have the brace adjusted to fit over my Klim jacket, so it may be possible to readjust it to open a bit wider on the Supershirt. As it is, the brace doesn't sit on my shoulders, even with the chest strap. It just springs up. I don't always wear the neck brace (it interferes with my Kriega R15 pack), but it would be great to have the option and have it be comfortable. 


Speaking of necks, if Adventure Spec is reading this (hi Greg!) I recommend scooping the front of the neck hole lower by about 1cm. It's in just the right position to chafe a little bit, but that may ease up as my Supershirt breaks in. 

Overall I'm impressed with the quality of this shirt and would summarize it as follows.

Pros:
  • It's one, breathable layer offering CE AA protection. Wow! I anticipate this transforming how I enjoy my riding, especially in hot weather. 
  • It's comfortable to wear but tough material. Construction quality is high.
  • Armour is well placed and held snugly in position. 
Cons (well, suggestions really):
  • Although the garment has been tested and certified to meet the CE AA rating, I'd like to see the back protector extend to the lumbar region as that can be a high-impact area (as with the tail bone) in trail riding. 
  • Neck hole could be a wee bit lower in front.
  • Armour pockets could use a tweak so fingers don't snag so easily on them.
  • Adding a second, lower pocket pouch for the back protector (or a Velcro sizing adjuster in a single, larger pouch) could allow the use of a longer back pad for lumbar protection if desired. 
  • Adding a couple of Velcro strips on the back would make it easy to attach an optional kidney belt (a.k.a. belly modifier...ahem).
  • Cost. I received a "VIP" discount as a result of being an early-adopter a year ago and feel the price even at full retail is fair considering the quality of the garment. However, as a Canadian, the combination of USD to CAD exchange rate coupled with an exorbitant shipping/brokerage fee from UPS ($160!), taxes, and duty brought my final price to CAD$568.81--almost double the cost of the shirt. The regular retail cost to Canadians will be significantly more than that (no VIP discount). In my experience with ordering international goods shipped to Canada, it's often been much cheaper (and faster) to order direct from the EU, Japan, or Australia than from the US. I would like to see more vendors offer Canadians more fulfillment options. I raised these points with Adventure Spec and they recognize the issue and are considering options.  
Major kudos to the team at Adventure Spec for launching the Supershirt. Version 1 looks great and I'm really looking forward to seeing how it works out over time.  I'll try to update this review later this summer once I've had a chance to do some long rides with it.

Wednesday, June 30, 2021

Tenere 700 - Suspension tuning update - Vast improvements!

Riders looking to get more practical performance out of their bike (whether motorcycle or bicycle, for that matter) are wise to first invest in tires and then suspension. Suspension tuning is especially vital to getting the most from your ride. Unless you fit the manufacturer's narrow criteria for rider weight (and many Japanese bikes are under-spring from the factory), chances are your bike will not handle as well as it could--especially on rough terrain.

Accelerated Technologies just north of Peterborough, Ontario, specializes in suspension tuning for all manner of vehicles, but especially sleds, ATVs, and motorbikes. John Sharrard, the brains and owner of the operation, is a former professional racer with championship titles to his name as well as some serious chops as a factory race tech for Honda and Yamaha. He had previously worked magic on my WR250R, completely transforming its off-road and on-road handling. Thus inspired, I was eager to bring him my 2021 Tenere 700 at the end of my first season with the bike, looking for a similar transformation. 

Having read countless online discussions about tuning the Tenere, a clear consensus emerged on the limitations of the factory setup. Mainly: the rear is under-sprung for riders above 165 lbs; putting in a stiffer shock spring requires additional damping beyond what the stock valving will achieve; and there are many complaints with high-speed compression damping front and rear. In addition, many people report that the clickers (fork and shock) have a much narrower range of effectiveness than the total number of potential clicks would suggest--imposing further limits on what damping you can achieve with the stock valving. Unfortunately, you need to modify the suspension if you're heavier than 75kg/165lbs and you plan to push the bike around in the dirt as it was intended to be used. 

For reference, I'm 91kg/200lbs in my birthday suit and 104kg/230lb in my riding suit. The tuning plan was to choose springs based on just me on the bike with no luggage and no preload applied so I'd have maximum range on the preload adjustment for when carrying luggage. That meant changing the shock spring. Interestingly, his sag measurements suggested that the factory fork springs were sufficiently rated--a bit of a surprise to me, given some of the online discussions I'd seen. 

Originally, I had installed an 80N-m shock spring from Rally Raid as well as the Rally Raid preload fork caps. While the stiffer shock spring reduced bottoming, John's opinion was that it still wasn't stiff enough. In fact, he noted that my shock appears to have bottomed even without luggage, so he wondered if that was the source of the harshness I'd felt. (However, I suspect the o-ring was in its lowest position based on other work I'd done.) John also felt the Rally Raid spring was the wrong dimensions for the application, so he replaced it with a longer version rated to 98N-m. As for re-valving, we agreed on a linear strategy to stiffen up the compression damping front and rear. This can be tricky to get right with a progressive linkage in the rear, so we just had to try something and go from there. 

By the time the first re-valving was completed, it was winter (-20C and snow) and unsafe to do a proper test ride. So I had to wait until spring to finally try it. Unfortunately, as soon as I hit the bumpy spring roads, I found the new setup to be extremely harsh. Low-speed compression damping could be managed by the clickers, but high-speed compression damping was so harsh that the bike would catch air off small expansion joints. Dirt roads and stutter bumps were a nightmare to ride at all but the lowest (or unsafely highest) speeds. And hitting any minor pothole or rock was like getting a 2x4 in my backside--leading to a wipeout on one trail that was obviously caused by the wheels pinging off ruts instead of rolling through them. Forget about hitting a pothole while cornering. The bike was simply far too harsh to ride for any length of time except on the smoothest roads or while standing. The high-speed compression damping needed to be dialled way back--but at least we now had some goalposts to work from. 

Below are the shock and fork setup notes from Accelerated Technologies. The details may be a little hard to decipher, so I've tried to decipher them below.


Shock tuning

Factory shock valving (9 valve shims):

  • 34 x 0.15
  • 32 x 2.0
  • 30 x 0.20
  • 28 x 0.20
  • 26 x 0.20
  • 22 x 0.20
  • 20 x 0.25
  • 20 x 0.25
Shock revalving attempt #1 (done at end of first season; red indicates the changes from factory):
  • 24 x 0.10
  • 32 x 2.0
  • 30 x 0.20
  • 28 x 0.20
  • 26 x 0.20
  • 22 x 0.20
  • 20 x 0.20
  • 18 x 0.20
  • 16 x 0.20
  • Washer

As noted, this setup was way too harsh and unrideable. Not recommended! Back to Accelerated Technologies for round #2. This time I rode my bike there and back - 650km in a day, to allow for testing. I brought my camping gear and set up in the back lot while they worked on my bike. Happy company with Bear, the shop dog, who was probably more interested in my lunch. 

Shock revalving attempt #2 (only 8 valve shims):

  • 30 x 0.20
  • 28 x 0.25
  • 26 x 0.25
  • 24 x 0.25
  • 22 x 0.25
  • 20 x 0.25
  • 18 x 0.30 (qty 2)
Fork tuning

Factory fork compression valving:
  • 16 x 0.10 (qty 5)
  • 12 x 0.10 (transition)
  • 16 x 0.10
  • 14 x 0.10
  • 12 x 0.15
  • 10 x 0.15
  • 16 Washer
Fork compression re-valving attempt #1 (red indicates changes from factory):
  • 16 x 0.15
  • 16 x 0.10 (qty 5)
  • 12 x 0.10 (transition)
  • 16 x 0.15
  • 15 x 0.10 (qty 4)
  • 14 x 0.15
  • 12 x 0.15
  • 10 x 0.15
  • 16 x 0.30 washer (qty 2) to expose more threads for additional shims

Note: the above tuning was too harsh, but not as bad as the shock felt. 

Fork compression re-valving attempt #2:

  • 16 x 0.15
  • 16 x 0.10 (qty 4)
  • 10 x 0.10 (transition)
  • 16 x 0.10
  • 15 x 0.10 (qty 2)
  • 14 x 0.15
  • 12 x 0.15
  • 10 x 0.15
  • 16 x 0.30 washer (qty 2) - Note: not sure if this was added in the revised stack
Factory fork rebound damping:
  • 16 x 0.10 (qty 5)
  • 10 x 0.10
  • 16 x 0.10
  • 14 x 0.10
  • 12 x 0.10
  • 10 x 0.10
  • 8 x 0.15
Fork rebound damping attempt #1 (changes in red; this worked well, so we didn't adjust it during second re-valving)
  • 16 x 0.15
  • 16 x 0.10 (qty 5)
  • 10 x 0.10
  • 16 x 0.10
  • 14 x 0.10
  • 12 x 0.10
  • 10 x 0.10
  • 8 x 0.15
Forks used 100mm of Motul 5 Wt full synthetic fork oil. As John said, if you're not sure what level of oil to choose, go with 100mm because it is almost always perfect, leaving you just enough air as a bumper. 


Setup #2 works very well, as I discovered first through several kilometres of testing with an unladen bike on a forest road near the shop, while stopping frequently to assess maximum suspension travel on the shock and forks. Grip on loose surfaces (especially uphill and downhill) was vastly improved, as was overall handling and braking. (On a historical note, this forest road is known locally as the "Oregon Trail". It's the original road allowance and homesteader trail for what later became County Road 39, located nearby. Gotta love those "lost" roads!)


On the ride home, I gave the fully laden bike (with five clicks of preload) a real workout on a mix of rough pavement and over 100km of rough forest roads. Again, the bike handled brilliantly under all conditions,  and used up the full range of suspension travel without noticeable bottoming, as evidenced by the position of the o-rings on the fork and shock.


It wasn't cheap, but it was well worth the expense to tune the Tenere in this manner. If I was to spend more money on tuning, it would be to upgrade the pistons for better bottoming feel. But realistically, I'm not a hard rider. Most of my riding is in the range of 50-100km/hr on dirt roads, with my sweet spot between 40-80 km/hr so I can enjoy the scenery. While I'm not taking jumps or looking to thrash my bike, I do insist on having the wheels follow the ground when they're supposed to ensure control. For me, the investment has resulted in a great setup and a lot more confidence on mixed surfaces.

Saturday, June 5, 2021

Review: CamelADV high exhaust for the Tenere 700


The Tenere's low-mounted exhaust has earned some rightful criticism for its tendency to bend into the swingarm if you drop the bike the wrong way. Since I was wanting to avoid this problem while losing some weight off the stock exhaust, I was excited to hear about CamelADV's project to develop a high exhaust kit. After plunking down a pre-order I then had to wait patiently over last winter for CamelADV to work through the logistical nightmare of shipping and receiving overseas goods in the middle of a pandemic. But in the end it all arrived well before riding season, and Cory was awesome about keeping everyone up to date on progress. 

Cory has already posted lots of good info about the exhaust at CamelADV, so I won't repeat that here. The exhaust pipe is beautifully made, the materials and fit are top-notch, and the results look great. Having now put a couple thousand kilometres on my exhaust, here are observations that may help if you're considering ordering one for your Tenere.

You have to cut your factory exhaust mount

Since the CamelADV silencer mounts higher than the stock silencer, there's no easy way to use the stock exhaust hanger which is welded to the rear subframe. So you need to cut it off. CamelADV includes an ingenious metal template to precisely locate the cuts, and a regular hacksaw will suffice if you're careful and patient. Just follow the excellent video on the CamelADV site. Some people may not like the idea of cutting their frame, but when you consider the OEM bracket is welded on, if you drop the bike on the exhaust you're likely to bend the hanger or subframe given the leverage of the long exhaust mount. The CamelADV approach reduces the leverage and beefs up the mount with a machined billet part. So realistically, adopting the CamelADV exhaust almost certainly makes your Tenere more robust in this area. 


CamelADV has suggested they may make a kit to return the exhaust hanger to stock. I imagine a simple steel rod insert would work fine, so I'm not too concerned if something needs to be done in this respect.

The silencer is LOUD!

CamelADV has chosen a generic silencer. It seems reasonably well made and is a good deal lighter than the stock silencer (at 3kg, it's about half the weight), which is important for handling given its higher location. However, I was actually mortified the first time I rode out because suddenly I was conspicuously like all those straight-pipe cruisers that drive me crazy when they're revving pat my house. This exhaust is not gonna be popular in the backwoods if discretion is required. 

Uncorked, the silencer delivers a guttural, savage, animal bark which I must admit sounds pretty awesome at idle and when blipping the throttle. But the problems arises when accelerating and cruising at 5000-6000 rpm (highway speeds). The combination of high tailpipe location and tone quickly becomes headache-inducing even with earplugs in and a quiet helmet (Shoei Hornet). Fortunately the silencer includes a dB-killer, which I now run with all the time (despite trying hard to get used to running without it). It makes the exhaust perfectly tolerable. Once again I can hear music and conversations in my headset, and vlogging isn't a monologue of exhaust note. However, the hole on the dB killer is rather small so I wouldn't be surprised if it reduces engine power, especially at higher RPMs. While a seat-of-the-pants test doesn't suggest a difference, I may experiment with enlarging the hole to something closer to stock. If that doesn't work, I may look for a different silencer. 

It fits with the RideADV pannier racks

Greg at RideADV Tours in Australia has some excellent Youtube videos describing mods for the Tenere 700. Since he runs a tour company, he and his crew have now put over 150,000 km of rough, real-world testing into their fleet of Teneres over the past two years, trying different suspension, tires, luggage, and other accessories to find that optimal mix for hard ADV performance. They really flog the bikes under ADV conditions similar to those in my area. I connected with Greg about the pannier racks they were developing and learned that he and Cory at CamelADV had also connected with each other to swap gear. They were able to determine that the CamelADV exhaust fits with the RideADV custom pannier racks. These racks are pretty interesting and I'll share details about them in a future post. Unlike all other racks I've seen for the Tenere, these ones hug the frame forward and low, in an optimal position to centralize mass and support soft or hard luggage on rough roads. Having tried rackless panniers last year, I concluded I didn't like how they flopped around on rough terrain despite some aggressive strapping approaches, and I reverted to a rack approach even though it means extra weight. 

The following pics are from Greg and show the prototype racks in his shop in Australia. (Note that he runs without the dB killer. As he told me, "I'm in the middle of bugger-all and it keeps the 'roos away!") Based on this, I ordered the racks. More on that to come...


Conclusion

It's a top-quality kit at a reasonable price that solves a minor design flaw of the Tenere 700 for offroad riding. The silencer is generic and, in my view, intolerably loud if you need to do a lot of highway miles or don't want to be "that guy". It's perfectly fine with the dB killer inserted and still sounds great. Unknown if the dB killer reduces performance. Unknown what other silencers may fit the kit geometry without requiring modifications to the connector pipe or hanger mount.

Review: Cyclops Aurora lights on the Tenere 700

In my part of the world (Eastern Ontario, Canada) dusk is when all the critters start to hang out on the road. And critters like deer are best detected and avoided long before they spring unpredictably across your path. The stock LED headlight on the Tenere 700 is pretty good for conspicuity in traffic but is so-so at best for night-time illumination. It is unlikely to show you deer lurking on the shoulder. So, if you plan to ride often at dusk or at night, auxiliary lights are going to be a valuable safety upgrade to increase your field and range of illumination over the Tenere's stock lighting. 

Years ago I outfitted my WR250R with a pair of 40W, 4-emitter LED lights from Fenix (similar to a Denali option) that turned night into day. They are especially helpful on dark forest trails during the shoulder seasons. While this would be great lighting on the Tenere, I figured it would be overkill because the headlight is already so much better than the anemic candle on the WRR. So I began to look for smaller, lighter auxiliary lights that could double as conspicuity lights.

After much searching I converged on the Cyclops Aurora LED lights. The build quality is excellent and the size (2" dia.) and illumination pattern seemed to be a good compromise over the tanning lights on my WRR, and over other, cheaper options I considered. 


I also recommend the orange halo feature which can be ordered optionally. It's not obvious from the product marketing photos, but adding the halo doesn't reduce the main lighting area. Rather, it converts an otherwise opaque section of the lens perimeter into an orange-lit halo illuminated by a second LED cluster with its own separate wiring. This arrangement gives you the flexibility to pair the halo with a turn signal or wire it always-on for conspicuity lighting; I opted for the latter. And since the halo is extremely bright, it's very conspicuous! For the style-conscious, mounting the Cyclops lights under the round headlights really completes the bug-eye theme of the Tenere's face. 

Fully lit, each Cyclops Aurora proves 19W of main LED lighting. That's plenty to through a beam a few hundred metres ahead with a decent spread to the light up the sides of the road. The result is a more complete wash of the way ahead than the OEM headlights alone achieve, especially with their sharp horizontal cutoff. The halos alone are also extremely bright and provide a substantial orange wash on the road ahead.

As for mounting the lights, there are few after-market brackets available. I wanted one that mounted to the lower triple clamp so the lights would turn with the bike (since the headlight doesn't). The best quality option I found was from Rugged Roads, although the OEM in the UK didn't have stock so I had to order from Germany (and it was cheaper than ordering from the manufacturer!). The bracket is top quality, nicely finished, and provides a sturdy and discreet mount for the lights in a relatively protected location. Note that if you've installed the high-fender kit on the Tenere, you will likely need to consider another mounting option since this bracket uses the high fender bolt holes. 


When I ordered the lights I didn't notice there's a special harness option available for the Tenere 700. Turns out you need this harness. I had intended to make my own harness using OEM connectors ordered from Eastern Beaver, and even rigged it all up only to discover that the Tenere uses a non-standard method to turn on the high beams: The ECU effectively grounds the high-beam circuit in the headlight to illuminate the additional LEDs. This is the opposite of typical high-beam lights and how most aftermarket auxiliary lights are controlled. These typically rely on 12V being supplied via the high beam lead when you flick the high beam switch. On the Tenere, you'd need a way to invert the control signal  Sure, there are some solid-state relays available that can trigger when switched from 12V to 0V, but by the time you factor in sourcing the parts and rigging the circuit, you're much better off just ordering the harness from Cyclops. It's only about $75 (don't quote me on that). Cyclops was generous enough to ship me just the harness (which normally isn't sold separately) when I called them to explain my situation.  

The high-beam wire is located on the right side of the dash near the turn signal plug. It's the yellow wire in the 6-position connector. I removed the pin and spliced in a heat-shrink-covered pigtail with a bullet connector to attach to the Cyclops harness. This makes it easy to revert to stock, and I don't like piercing insulation with wiretaps since that can allow moisture ingress leading to corrosion.

The Cyclops harness plugs into the Tenere's left side auxiliary connector (white; near the indicator connector) which is switched with the ignition. 

The Tenere includes four auxiliary connectors at the front: a triangular three-pin connector on each side intended for heated grips and auxiliary lights; and a rectangular two-pin connector on each side for accessories that mount in the dash holes. (Note that the left accessory plug powers the 12V plug on the dash; the other accessory plug is unused on my bike because it requires an obscure connector that I haven't gotten around to switching for something waterproof and more readily available. However, I'm likely to rig it to power the double USB port on my dash which is currently wired into the PC-8.) Since I had already used the righthand three-pin connector to plug in my Eastern Beaver PC-8 expansion box (so it would turn on with the ignition), I routed all the Cyclops wiring to the left side. 

Wiring the lights was initially a bit of a chore, mainly because of the lack of room to tuck away the extra wiring. I won't describe the gong-show of different options I tried to hide the relay and wiring inside the headlight housing. Don't waste your time with this approach. It would be the neatest, but it just doesn't fit because of the Cyclops switch relay, and it also creates the problem of being a pain to access in the event of an electrical gremlin.  

The method Cyclops recommended to position the wiring didn't seem very practical to me so I experimented with some different approaches. In the end, I mounted the slack wiring as a vertical loop against the left fork inside the triple clamp, positioning the connectors in this location with a short section of bicycle inner tube for mechanical protection, and zip-typing the whole mess to the fork tube. The relay and excess wiring got zip-tied to the plastic frame mount near the aux connectors, where it's easily accessible by removing the left body panel and is reasonably well protected from rain and splashes. Overall, the arrangement minimizes flexing of the wires and keeps it clear of the other wire and cable spaghetti in this area when turning the bars. 

After a few thousand kilometres of riding the lights have performed very well. The orange glow really seems to catch people's eyes and it makes a striking front-end for the Tenere. Illumination is greatly improved and the beam spread is easily adjustable to ensure both a good wash of area lighting (looking a bit wall-eyed on my bike) as well as a safe cutoff height to reduce the risk of blinding of oncomers. While a dimmer can be used with these lights (and I use a Skene with my WRR setup), I don't feel it's necessary given the always-on conspicuity of the orange halo by itself. Flicking the high beams gives that extra sauce for max visibility. 

My only complaint with the lights is the factory strain relief on the aluminum housing seems to be an inflexible material, causing the external insulation to pull back from the internal wiring. While I could tuck it back together, this is a weakness in the environmental integrity that I'll need to keep an eye on. Some silicone tape or sealant may be needed to ensure a better mechanical connection in this location.  

Sunday, January 3, 2021

Cleaning a vintage CCM bicycle wheel


The Canada Cycle & Motor Company (CCM) has a fascinating history. For many middle-aged Canadians today, during their childhood CCM was a respected household name for hockey equipment, including ice skates, pads, and sticks. But the company's origins date to 1899, when CCM manufactured high quality bicycles in Toronto as part of its operations with the Russell Motor Car Company. The picture below is from CCM's 1918 catalogue.


CCM's bicycle products carried through to the company's demise in 1983, although by the end they had gained a reputation as a cheap department store bike that competed with increasing low-cost imports from other markets, such as Asia. 


Although the lustre of CCM bikes has long since waned, many years ago I considered myself fortunate to have found a rear wheel from a CCM bicycle in a now-defunct antique store in Carleton Place. It's been on my to-do list for years to clean up this wheel so I could give I could display it in my office. 

According to information from this interesting site (based in nearby Perth, Ontario), it appears my wheel could date to 1908-1918. The hub is a "Hercules" armless coaster brake, one of CCM's models manufactured under license from Musselman (patent number 106391). 


The oil port in the middle of the hub is inscribed with what appears to be "JOSLUCASL2", "No 1" and "BIRMM". (I'm guessing this is a part made by Lucas Industries in Birmingham, England, which was a major centre of bicycle and motorcycle manufacturing and home of BSA.) Apparently, CCM marketed oil specifically for their Hercules coaster brake hubs in the late 1920s. Their brake grease didn't appear until the 1930s and even then the company recommended the periodic addition of a few drops of oil to preserve performance. (As a footnote, there was debate among cyclists as early as the late 1890s as to whether grease or oil was better for hubs!)


Since it's not a "New Hercules" model, it's almost certainly the original 1908 model as shown in the patent and product sheets below. 


The wooden rim was painted black and appears to lack evidence of pin striping, which was added to later, fancier models. It also lacks a metal rim strip added to reinforce later wheels, although there are two small nails and some cloth remnants near the valve hole, which probably held a cotton rim strip. As with modern rims, the valve hole is opposite the rim seam, which in this case is a glued finger joint. The wood is fine-grained and appears to be hard maple or maybe birch.


The hub and spokes are nickel-plated, the nipples are brass. 


I disassembled and cleaned the bearings and coaster brake mechanism, and straightened and chased the threads on the axle. It now works smoothly when reassembled! I also removed surface rust from the spokes and applied a conservator's microcrystalline wax to all metal parts to retard further corrosion. Varsol and linseed oil were used to clean and protect the wooden rim, as I felt this was an authentic and appropriate treatment given the probable age of the wheel. Unfortunately, there's too much corrosion to risk tightening the fragile spokes, so it won't be possible to true up the wheel. However, it holds its shape well enough as-is. 

As a bicycle enthusiast, I'm thrilled to have this wheel on display as a reminder of Canadian cycling heritage. I wonder who, a hundred years from now, may admire some of the wheels I've built?