Pretty awesome riding on an awesome dirt trail:
https://www.youtube.com/watch?v=jxTvMaJBT3c
Saturday, November 8, 2014
Sunday, October 5, 2014
The definition of dual sporter!
Saw this head-turning setup at Kingdom Trails in Vermont last weekend:

Marc, the rider, rigged a rack for his mountain bike on the back of his GS. Pretty slick. Nice touch with the hockey puck mounts, too. Apologies for the image quality. It was a borrowed camera apparently with an Instagram filter permanently on.

Pics taken at the Mike's Tiki Bar behind the Pub Outback. 30 craft beers on tap and the best burritos outside the Blue Bonnet in Denver. What more reason do you need to go?

Marc, the rider, rigged a rack for his mountain bike on the back of his GS. Pretty slick. Nice touch with the hockey puck mounts, too. Apologies for the image quality. It was a borrowed camera apparently with an Instagram filter permanently on.
Pics taken at the Mike's Tiki Bar behind the Pub Outback. 30 craft beers on tap and the best burritos outside the Blue Bonnet in Denver. What more reason do you need to go?
Tuesday, September 16, 2014
Thursday, September 11, 2014
1x10 setup on the Tallboy 29er
When I ordered my 2014 Tallboy 2 Carbon last year, I opted for the 2x10 XT setup, figuring this would save weight over a triple crank while not losing any practical gearing. It was a good decision. The wide cassette ranges available now (mine is an 11-36T), combined with the lack of truly steep terrain in my area, pretty much eliminates the need for a traditional granny ring. The 26/38T rings up front have proven more than adequate for my needs (and knees).

However, a closer look at the wear patterns on my cassette and rings after a full year of riding reveals some opportunities to simplify the drivetrain further--and save weight. Most of my cassette usage has been in the middle 19/21/24 cogs. I've also noticed that I shift the front (26/38T) fairly often on relatively flat ground. This suggests an intermediate chainring size might be better than either the 26T or 38T. So that brought me to the 1x10 setup which promises a smaller but more useful range of gearing based on actual need.
Would 1x10 make sense in the mountains, or at Moab, where the terrain is steep and traction amazing compared to our snotty clay? Probably not. But then, it's not like I get to ride in those locations often. Also, I'm pretty strong rider and can usually power through stuff without shifting, where most riders need to shift. Provided I can cover the gearing extremes for my usual riding, all the extra ratios should be unnecessary.
Choosing the right ratios
Stock 2x10 gearing was 26/38T rings and 11-36T cassette. The extreme ratios for these numbers are 1:0.72 - 1:3.45. Most of my riding was in the 38T ring and 19-24T cogs, for a range of 1.58-2. Taking the average, my most common ratio is 1:1.79.
Replacing the front with a single 32T ring and keeping the cassette the same would give me a range of 1:0.88 - 1:2.9, with the middle ratio being 1:1.89. For a 34T ring, the range is 1:0.94 - 1:3.09, with middle 1:2.01. Given I usually ride higher gears, a 34T was tempting. But since many people reported good results with a 30T, I settled on the 32T as a compromise. It'll give gearing only slightly taller than my most commonly used 2x10 ratios.
Wide-narrow rings are the secret
These are not your mother's chainrings. To ensure your chain stays on the ring without the safety of a front derailleur, the teeth are designed with an alternating wide/narrow pattern that completely fills the corresponding holes in your chain. The teeth are also taller to reduce the chances of bounce-off. The RaceFace (104mm BCD) was highly rated and a bargain at about $45 from Jensen.


The result is a chunky-looking ring that mates intimately with your chain, yet allows enough side-movement for shifting across the entire cassette. Most of the online discussions recommend using a clutch-style rear derailleur (like the XT I'm already running) to reduce chain bounce and risk of losing the chain in a 1x10 configuration.
Installation
Ideally, the chain line should be centered with your cassette. I used a couple of spacers to nudge the ring inwards of the middle position on the spider. I also shortened the chain by about 4-6 links to reduce chain slap. Look at all the stuff that came off!

Performance
A quick ride down the street suggests everything works perfectly and the ratios are in the right ballpark. Hopefully the gearing proves not too short (or tall) for riding at Kingdom Trails in a couple of weekends. Already I prefer the setup because it completely eliminates the risks of hitting the derailleur with the swing arm, or nasty chain suck. The more open space means easier maintenance when the clay starts flingin'.
Look at that extra ground clearance!

Thanks to my riding buddy "Skid" Marc Labonte for sharing his thoughts on his own conversion to a 1x10 setup.
Update: Just gave it a good trail workout and can say this is an AWESOME setup. Bike feels more planted, maybe because there's absolutely no chain slap or noise like you'd hear with a front derailleur. The larger teeth and smaller ring probably also contribute to the sense of a better connection to the back wheel. Gear ratios are good too: no problems tackling a few steep (but short) climbs or picking up some speed on long downhills. The simplification of having one less thing to fuss with (front shifting) also seems to let me focus more on riding. This was definitely a good good upgrade to the Tallboy.
Update 2: After a long weekend of riding at Kingdom Trails (including some DH at Burke Mountain) and a punishing steep technical ride in Gatineau Park (well beyond the limits of traction in places), I can say there are absolutely no shortcomings with the gearing. Bike runs cleaner, quieter, and more reliably across the full range, in both sandy and muddy conditions, than with a front derailleur. I wouldn't change a thing.
Would 1x10 make sense in the mountains, or at Moab, where the terrain is steep and traction amazing compared to our snotty clay? Probably not. But then, it's not like I get to ride in those locations often. Also, I'm pretty strong rider and can usually power through stuff without shifting, where most riders need to shift. Provided I can cover the gearing extremes for my usual riding, all the extra ratios should be unnecessary.
Choosing the right ratios
Stock 2x10 gearing was 26/38T rings and 11-36T cassette. The extreme ratios for these numbers are 1:0.72 - 1:3.45. Most of my riding was in the 38T ring and 19-24T cogs, for a range of 1.58-2. Taking the average, my most common ratio is 1:1.79.
Replacing the front with a single 32T ring and keeping the cassette the same would give me a range of 1:0.88 - 1:2.9, with the middle ratio being 1:1.89. For a 34T ring, the range is 1:0.94 - 1:3.09, with middle 1:2.01. Given I usually ride higher gears, a 34T was tempting. But since many people reported good results with a 30T, I settled on the 32T as a compromise. It'll give gearing only slightly taller than my most commonly used 2x10 ratios.
Wide-narrow rings are the secret
These are not your mother's chainrings. To ensure your chain stays on the ring without the safety of a front derailleur, the teeth are designed with an alternating wide/narrow pattern that completely fills the corresponding holes in your chain. The teeth are also taller to reduce the chances of bounce-off. The RaceFace (104mm BCD) was highly rated and a bargain at about $45 from Jensen.
Below you can see the size difference between 26T, 32T and 38T.
Installation
Ideally, the chain line should be centered with your cassette. I used a couple of spacers to nudge the ring inwards of the middle position on the spider. I also shortened the chain by about 4-6 links to reduce chain slap. Look at all the stuff that came off!
A quick ride down the street suggests everything works perfectly and the ratios are in the right ballpark. Hopefully the gearing proves not too short (or tall) for riding at Kingdom Trails in a couple of weekends. Already I prefer the setup because it completely eliminates the risks of hitting the derailleur with the swing arm, or nasty chain suck. The more open space means easier maintenance when the clay starts flingin'.
Look at that extra ground clearance!
Thanks to my riding buddy "Skid" Marc Labonte for sharing his thoughts on his own conversion to a 1x10 setup.
Update: Just gave it a good trail workout and can say this is an AWESOME setup. Bike feels more planted, maybe because there's absolutely no chain slap or noise like you'd hear with a front derailleur. The larger teeth and smaller ring probably also contribute to the sense of a better connection to the back wheel. Gear ratios are good too: no problems tackling a few steep (but short) climbs or picking up some speed on long downhills. The simplification of having one less thing to fuss with (front shifting) also seems to let me focus more on riding. This was definitely a good good upgrade to the Tallboy.
Update 2: After a long weekend of riding at Kingdom Trails (including some DH at Burke Mountain) and a punishing steep technical ride in Gatineau Park (well beyond the limits of traction in places), I can say there are absolutely no shortcomings with the gearing. Bike runs cleaner, quieter, and more reliably across the full range, in both sandy and muddy conditions, than with a front derailleur. I wouldn't change a thing.
Wednesday, August 27, 2014
Trail tools for dual sport riding
Here's the standard kit I carry when riding in the bush. Although I've never flatted or broken down on the road, these are the same tools I use in the shop, so I know what I need and how to use them. Everything fits into the little tail bag with a some room left over for lunch.

From top left to bottom right:
1. Tail bag and protective rain cover on my ghetto frame which mounts over a 1-gallon RotoPax
2. Spare socks
3. Front and rear tubes
4. Bungies
5. Carabiner (can help when rigging a hoist for bike)
6. Emergency reflective mylar blanket (protects against cold, heat, rain)
7. TP, hand-sanitizer and lighter
8. 8mm and 10mm sockets
9. 4/5/6mm hex Y-tool
10. Folding 1/4 socket drive with extension
11. 10' of 9mm static line (e.g. for towing or rigging a bike hoist)
12. Silicone nylon tarp. Weighs nothing, compresses down, creates a big shelter.
13. Mesh bag for tools
14. Big adjustable wrench
15. Mountain bike pump
16. Two tire spoons
17. Folding saw
18. CO2 compressed air cartridges and filler valve
19. Microfibre cloth (for visor, first aid)
20. Details map on Teslin
21. Tube patch kit
22. Gerber multitool
23. Windproof lighter
24. Spare AA batteries for GPS (although it's also powered by my bike)
25. Two protein bars and a Clif bar (easier to think straight when I'm not hungry)
26. LED headlamp
27. JB Weld (not shown)
28. Pen, mechanical pencil, paper (not shown)
What would I add or change? The large adjustable wrench is unnecessarily heavy and should be replaced by a dedicated axle wrench for my front/rear wheel nuts. It's on the shopping list. Also, a roll of duct tape can come in handy. For longer rides I'll also add a long-sleeve wool shirt as a dry, warm backup. With this kit I can spend a night out or work on the bike in the rain.
Edit: I've since improved the tool selection.
Saturday, August 23, 2014
Long-term review: 2014 Santa Cruz Tallboy 2 Carbon 29er
Last year the stork was kind enough to drop off a fine new ride in XT build, although some bribery in the form of selling the Trance X0, time-trial bike, Zipp 808 wheel set, and Compu-Trainer, and then throwing in a can of sardines was needed to seal the deal.
Riding the Tallboy has been hugely rewarding in terms of flow and speed compared to my 26" Trance. While the Trance was a custom, high-end build from the frame up, it was no match for the five more years of technological advancement distilled into the Tallboy. It all adds up to a lighter, stiffer, more responsive bike that rolls over lumpy trails where a 26er bogs down. The Tallboy has made me a better rider.
However, not all is golden in the land of new bikes. Since I first started mountain biking back in the dark ages of Biopace chain rings in the 80's, there's no question that modern bikes represent an entirely different sport. Today's components from pretty much all the manufacturers perform so well, that the only real choice becomes a matter of taste. Unfortunately, the tradeoff has been reliability. Years ago, an XT set-up would provide at least a good season or two of hard use before parts needed replacement. By comparison, the XT components on my Tallboy barely eked out one season of only moderate use (oh, where did all my free time go?). This suggests that manufacturers should start trading back ultra light weight for more durability and serviceability. Fact is, few race at the elite level where shaving grams can make a difference. The rest of us who've dropped six grand on a dream ride that was not meant to be a helium balloon should reasonably expect to get a full year of riding before having to spend hundreds of dollars replacing prematurely worn components.
Here's a summary of observations about the Tallboy. Some of these are things that Santa Cruz should consider fixing; others require manufacturers to step up.
1. Better swing arm protection. The right chain stay sits awfully close to the rings on a 2x10 setup. On several occasions I've had chain suck (on a freshly cleaned and lubed chain, no less) that resulted in jamming the chain into the tiny gap between the teeth. Once I even had to remove the crank arm to free the chain. Another concern is that at full rear compression, the front derailleur hits the top of the chain stay. I don't see how the setup can be changed to avoid this problem. Chunks are missing from the precious carbon fibre. The existing co-moulded metal protection needs to be reshaped to protect this exposed area.
If you look carefully, you can see the distinct dent from the derailleur on top, and the gouging from chain suck on the side. The moulded protector just misses the fun.

2. Pivot designs that facilitate bearing service and replacement. The Santa Cruz pivots are a decent improvement over many other designs because they incorporate grease nipples to allow the bottom bearings to be be greased without disassembly. Inspection of the lower pivot bearings shows the concept works. However, the upper bearings are a pain to pull, as an earlier blog post details. I'd like to see a completely new approach to pivot bearing design that gives up just a bit of weight to allow the use of larger bearings. These babies take a lot of abuse, so make 'em bigger.
3. Stiffer wheels. Overall these wheels have proven quite reliable. The hubs (DT350) are still silky smooth, the freehub is dead-simple to service, and the rims resist dents. But there's just a little too much flexibility. Spokes that are one gauge heavier would be preferable, especially on large frames like mine where the rider and gear is likely to be in the 200lb range.
4. Better tires. The stock CrossMark tires are, in the words of one rider I met in Kingdom Trails, "the worst 29er tire ever". While I didn't find them that bad, something without the almost continuous centre ridge line would be preferable. The Mavic Roams that I'm riding now are not hugely better, just different. Not sure what to suggest, because I ride a lot of clay and any small-block tire (for lower weight and rolling resistance) is going to suck in mud of any kind--especially clay mud.
5. 180mm rotor on the front. This is a major oversight on the stock build, which specs 160mm front and rear (XT in my case). 160mm simply does not provide enough stopping power--especially for larger riders. After trying metal pads, heat-sink pads, resin pads, and an Avid rotor, I finally gave up on finding any stopping power in a 160mm front or eliminating a horrible squeal, and changed to 180mm. It's a massive improvement. Incidentally, Fox rates the Float 32 CTD 29er shock good for up to a 200mm rotor.

6. Poor XT cassette durability. For the first time ever, I've worn out the rivets holding the middle cogs together before the cogs themselves. As a result the middle cogs jangle around and I'm just waiting to shear the rivets altogether. WTF, Shimano?! This should never be an issue. Try using a better rivet. This is clearly a design or manufacturing defect and Shimano should warranty it. And I'm not alone: my local bike shop has seen this problem many times and warranty coverage is not forthcoming.
Edit: Days after posting I actually sheared three of the five rivets on a moderate (flat) trail ride and couldn't hold the chain on the middle cogs. The broken bits fell out of the cassette when I disassembled it. Fortunately my new cassette arrived shortly after from Chain Reaction Cycles ($61 delivered to Canada from the UK, vs. about $115 from my LBS). Same part, identical construction. In the second pic you can see two of the tiny rivet heads that sheared off. The neck of the rivets is barely 1-1.5mm in diameter. Clearly not enough material to withstand normal riding torque. Shameful engineering.


Edit: Days after posting I actually sheared three of the five rivets on a moderate (flat) trail ride and couldn't hold the chain on the middle cogs. The broken bits fell out of the cassette when I disassembled it. Fortunately my new cassette arrived shortly after from Chain Reaction Cycles ($61 delivered to Canada from the UK, vs. about $115 from my LBS). Same part, identical construction. In the second pic you can see two of the tiny rivet heads that sheared off. The neck of the rivets is barely 1-1.5mm in diameter. Clearly not enough material to withstand normal riding torque. Shameful engineering.
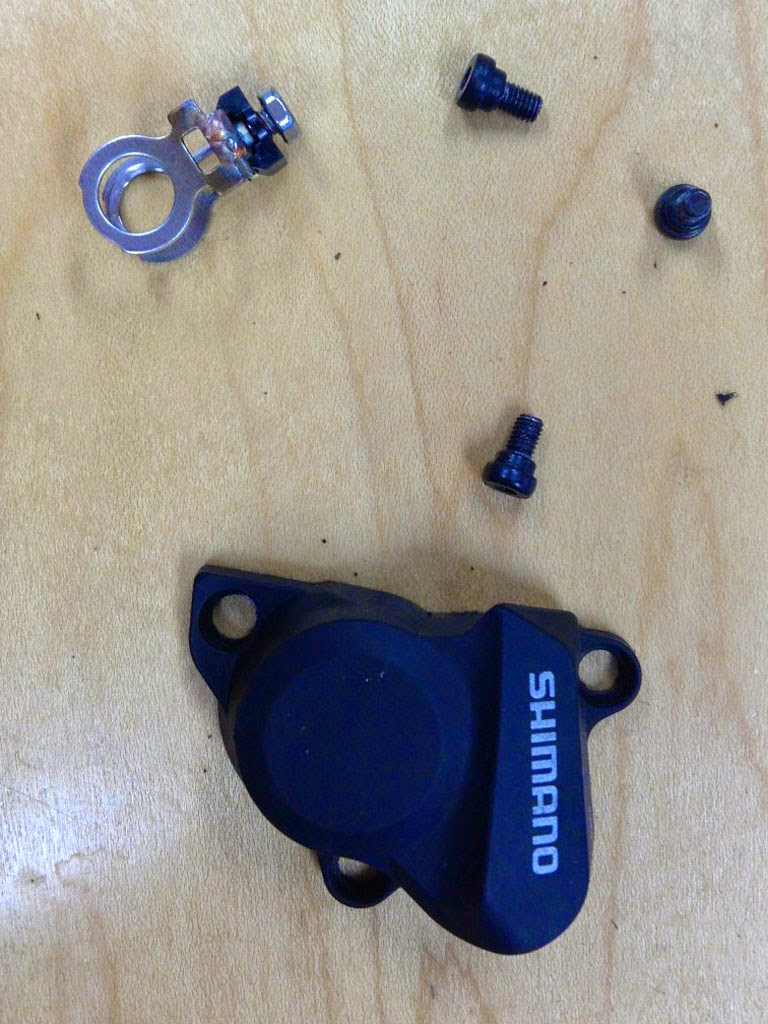
7. Ridiculous failure of an obscure part inside the XT clutched rear derailleur. This optional feature turns a little cam mechanism that applies tension to a one-way clutch on the derailleur arm and thereby reduces chain slap. Great idea, but the internal cam mechanism incorporates a crappy stamped metal part that breaks. Inexcusable: this part doesn't move while riding, and isn't exposed to the environment. Again, WTF, Shimano?! This is absolutely a warranty issue and I'm not alone in seeing the problem. Fortunately a neighbor was able to MIG-weld a repair. Otherwise it would've been a two month wait for a replacement from Shimano.
Here you can see the one-way clutch and the cam (with square hole):

Below at top left is the offending part. It snapped at a bend. It holds the cam seen in the photo above, so when you move the external lever, the cam apply pressure to the brake mechanism wrapped around the one-way clutch, thereby preventing the chain from pulling and slapping up into the stay. Nifty idea. After the metal retainer broke, the derailleur still works but you can no longer tension the arm and so you get normal chain slap action. In the picture, you can see the tiny repair weld on the retainer.
Despite what these gripes may suggest, I love this bike and have a blast riding it. The main shortcoming is my own technical riding ability. So far I haven't reached the limits of what the bike can do.
Friday, August 22, 2014
Dual sport ride route - Lanark County Loop 1

This 206 km route starts just west of Ottawa, in Almonte, and makes a big clockwise loop into Lanark Highlands, passing through Blakeney, Clayton, Hopetown, Lavant, Lavant Station, Calabogie, and White Lake. It encircles 1026 square kilometers of rugged terrain on roads that vary from twisty pavement and gravel, to roller-coaster fire roads and rocky bush trails. The rough dirt sections are near the start and middle of the route. At the end of the route, when you're more likely to be tired, you're mostly on good paved or gravel roads. Options abound to add more technical challenge along the way. Count on about 4-5 hours to do the basic route; way-finding will slow you down. Robertson Lake on South Lavant Road is a good place to stop for a picnic, swim or washroom break.


What bike?
You can ride this on pretty much any DS bike and 50/50 tire. My current setup is a WR250R with Heidenau Scouts front and rear. Although knobbies would be preferable in the dirt and mud, you'll appreciate not having them for the longer stretches of gravel and pavement. I've tried to mix up the riding to keep things interesting! Bigger bikes (>650cc) and bikes with cast wheels may struggle a bit in the short muddy and rocky sections, but if you take it easy and don't mind getting a little dirty, you should get through everything without a hitch.


Two caveats
1. You need to be self-sufficient for repairs. While it's rare that I don't see people along the route (even in the bush sections), if you break down and can't fix it yourself, it could be a while before someone picks you up. You may face a long walk or the need to camp out. I bring essentials like a light tarp, food, headlamp, spare tubes, tire repair tools, saw, fire starter, rope, and an extra wool shirt. Cell phone coverage seems to be pretty good along the route, but don't count on it.
2. The back (western-most) section runs through Crown land which appears to require a road permit for access. Finding trail passes at local retailers is a total crap shoot. Every year I ask around at ATV dealers, hook-and-bullet stores, etc.--and all I get is baffled looks or stories of disorganization at the trail associations. Your best bet is to order a permit from TheTrail.ca. An annual pass costs $150 and is the best deal among the options. While fees are no fun, as a trail builder myself I know the volunteer effort and cost that goes into obtaining and maintaining trail access, so I don't grumble about paying to enjoy this remarkable bounty of riding goodness. Nevertheless, in several years of trail riding I've never once been asked to show my pass.

Finding your way
Download the GPX here and follow it closely. There are many confusing intersections and side trails. One tricky area in particular is the first bush track section (about 4.5 km long) off the 6th concession from Middleville to Bow Lake Road. Don't be fooled by taking a side trail that seems better traveled. The correct route looks sketchy in a few places but is actually fine to ride. The details below should help.
Middleville to Bow Lake Road
From the Middleville Museum (well worth a visit if you have time), continue down the 6th concession until it turns into a dirt track.

At the first big intersection (note the yellow sign), keep left:


After following a good track for a while, you come to the second main intersection.
Again, keep left (the less-travelled trail):

At the third main intersection (note the yellow sign), take the rough-looking trail leading straight ahead:

This next section of trail presents exposed rock sections and sand. It's also quite pretty, passing through pine stands and some roller-coaster sections. Eventually you reach the fourth main intersection, a sandy turn. Go right:

From here stay on the main, obvious trail which is well travelled but rough in several places. Watch for fallen branches and other debris. There's one main mud hole which, depending on recent rain, could be full of water. It's not very deep (less than hub depth) and if you keep some speed and paddle with your feet you'll get through just fine. Shortly after the mud hole you'll pass through some steep loose sections and a few more puddles, then pop out onto Bow Lake Road (gravel). This bush section is the muddiest of the entire route.
Most of the side trails along here end at lakes or the Clyde River, so if you take a wrong turn, it becomes obvious pretty soon.
Bailouts
There are many options to cut the route short and head back to civilization. In particular, Wolf Grove Rd through Middleville, Highway 511, Burnstown Rd, and White Lake Road are main exits. All of these are great rides by themselves. One of the hidden riding gems is County Rd. 16 (Lavant Rd) from Hopetown out through Lavant Station.
Disclaimer
While I've made a reasonable effort to ensure the accuracy of this ride information, it's only a suggested route and I cannot be held liable for any errors, omissions, changes in route conditions that may affect your ride, or consequences of using this information. Plan accordingly, ride with a buddy, and use common sense.
Saturday, August 16, 2014
Lost school house on McKenna Road near Marlborough Forest
About 40km southwest of Ottawa, on Dwyer Hill Road near Richmond, lies the rugged Marlborough Forest. Like much of the area between Ottawa and Carleton Place, the Marlborough terrain consists of barren patches of limestone pavement punctuated by broad swamps and scrubby thickets of spruce and cedar. Not exactly farm country, but full of all kinds of wildlife including bears, deer, and some rare species of plants, snails, and other small creatures. Great terrain to explore on a dual sport bike: the motor allows you to evade the bugs (mostly) and make somewhat of a cool breeze on an otherwise hot, shadeless day.
Unfortunately for dual sport riders, the intriguing forest trails that continue off O’Neil Road, Roger Stevens Drive, and Flood Road in Marlborough Forest are now closed from March to September—prime riding season. Since I wasn’t about to make a special trip back to mountain bike the area, exploration will have to wait until there’s a safe window around hunting season. It’s disappointing but the need to restrict access is entirely understandable. Too bad some people ruin access for everyone by not following with the rules. If you do choose to ride here, please stay on the roads and be gentle on the landscape. We're lucky to have this rare natural environment so close to an urban centre--let's keep it in good condition!
Fortunately, the closing of one riding opportunity often enables other interesting finds.
One find in particular is an unmarked pioneer burial ground that lies near the rail crossing at Dwyer Hill Road. It's a rare bit of history and testimony to the hardscrabble existence the early Europeans faced when homesteading in this area. The pervasive limestone prevented digging graves, so burials consisted of piling stones on the remains. Coincidentally, CBC Radio featured a story on this very site shortly after my visit. Apparently it's not listed in the registry of Ontario burial grounds and may need an archaeological assessment.
While returning from Marlborough Forest west along Roger Stevens Drive, I took a random turn down McKenna Road and soon encountered this intriguing old one-room school house.

All by its lonesome down an uninhabited road (it’s funny to think of the Google street view car coming down here), the building appears to date from the early 1900s and was probably still used as a school house up to the 1960s or even 1970s. A hand pump stood in the overgrown yard, and behind the building were remnants of a two-seater outhouse.


It looks like the outhouse used cans located under the seat and behind an access door at the back (I grew up with a similar arrangement in Australia). The rock would not have allowed excavation of a pit. It was probably a punishment for some poor student to have to dump the cans at the back of the lot somewhere.
Surprisingly, the school house is open and maintained on the inside.


None of the information posted inside indicated the history of the building. A web search revealed it’s owned by the Ministry of Natural Resources and serves as a base for hiking trails on adjacent lands. Later, I tried to find out about the history of the building but couldn’t find a record of it in my usual sources. oneroomschoolhouses.ca didn't have a listing either. Since then I've managed to find out more - see the end of this posting for an update.
Traveling past the school house, the road deteriorates into a rough track that passes a lonely abandoned homestead and then crosses a swamp. Don't be deterred by the swamp. You can ride through it quite easily on a large bike with 50/50 tires because the bottom is solid gravel and the muddy parts are not very slippery. In any case, the track joins a main gravel road just a few dozen metres past the water crossing.


This was a great little find of pioneer history right on the doorstep of our nation's capital.
Update
Owen Cooke, a volunteer at the Rideau Township Archives, was kind enough to show me a binder of historical records they have on this school house. These consist mainly of handwritten bylaws dating back to 1887 that cover the formation of the school sections. I took pictures of all the contents - contact me if you want copies. Below are some highlights I've pieced together.
Note: The wording of the bylaws is a bit confusing because it refers to both the formation of school sections, and schools. I'm not sure what relates specifically to the school house in question. Some of the details would need to be compared with contemporary maps of the area.
- Known as S. S. No. 17 Marlborough Township. Location indicated as Part Lot 28, Conc 6, one half acre in Ontario Archives. Also indicated as Lot 27, Con 7 (perhaps incorrectly?) on 1975 photo.

- Also known as the "McKenna School" because many McKennas went there.
- Bylaw 146 dated September 24, 1887 in Marlborough Township describes the formation of Protestant Separate School number 1 under the Separate Schools Act of 1886. At that time the area was largely settled by Irish Catholics. It seems that Protestants had to form a certain minimum number and petition for their own school section. The bylaw defines the parcels of land within the section area.

- Bylaw 206 dated 1899 repeals Bylaw 146 and describes the formation of Public School Section number 16 to replace Protestant Separate School number 1 (a.k.a. "section" number 1). This appears to have been done at the request of the Protestants who requested the formation of the original separate school section. The area of the school section is also enlarged substantially to at least 2700 acres. It is likely the larger catchment area contains additional school houses built or repurposed to serve the larger population. Contemporary maps show additional school houses in the general area, but I haven't compared their locations to the specific catchment area.
- Bylaw 232 dated December 24, 1902 describes the formation of the school as a Protestant Separate School (S. S. #1); they seemed to have formed a quorum and made their case around June 7, 1902.
- Bylaw 251 dated May 21, 1904 describes Protestant S. S. #1 being dissolved and thereafter being known as S. S. #17 (a public school).
- Bylaw 322 dated June 1, 1912, describes the formation of school section 18, which includes portions of school sections 1 & 3. Amalgamation!
- Teachers included Lula Hulladay of North Montague (1905), and Viola Argue (1930-31).
Tuesday, August 5, 2014
Lanark County DS tour
Looking for a mixed-road adventure west of Ottawa? I'm mapping out a dualsport day ride that starts in Almonte and loops through Lanark County via a smorgasbord of twisty trails, fire roads, pavement, and a little bit of mud to keep it honest. The route is suitable for larger DS bikes with 50/50 tires (I'm riding Heidenau Scouts with no problems) and small bikes with at least 200km of range.
Although I've ridden all sections separately on different occasions, this particular combo still needs to be mapped but I hope to have that done in the next few weeks. Then I'll post the GPS file here. Let me know in the comments if you are interested in a guided tour and we can set up a date.
Update: Here it is!
Monday, July 21, 2014
Goodbye to Tubliss
After a few thousand kilometers of mixed road and trail riding with the Tubliss system on my WR (combined with Heidenau Scout tires F/R), I've decided to revert to tubes. Here're my observations from the experiment.
1. Balancing is a pain. Tubliss is intended for off-road use, and the reason probably boils down to balancing the rim lock and heavy hardware for higher speeds. Provided you're not racing at high speeds, where tire heat may cause problems with the inner tube, there doesn't seem to be any reason why the Tubliss shouldn't be fine on-road except for balancing. I found that over 50km/hr, vibration on the front was a real issue (especially on long rides!) despite adding a whole lot of wheel balancing weights. Couldn't tell if the back wheel was also a problem. It just became too much for me, and no reasonable amount of Slime or weights made it tolerable.

2. What a mess! The combination of sealant and finicky installation is not conducive to trailside repairs while being attacked by bugs. Nope, would rather set myself on fire than go through that in some fetid swamp. On the other hand, if you're doing pure MX, where there's a higher chance of flats, then the hassle of Tubliss may be worth the additional puncture resistance. But not for my comparatively sedate DS riding. I'm tackling dirt tracks, fire roads, water crossings, and pavement--not exactly high-risk puncture zones, although thorns are a real threat. I also noticed that the Slime seemed to attack the aluminum of my rim, causing discoloration in places but no pitting. Finally, I could not see stuffing a regular tube into the tire if the Tubliss failed outright.


3. Regular tubes are simple and readily available. I can change them fast. Tire spoons, Armor-All, and years of practice make it way easier than a Tubliss repair. There's only one valve to worry about, no Slime, no extra nuts, and no need for high pressure tubes. To be fair, the Tubliss only lost about 10 lb per week, but pumping up any tire to 100 psi is a pain with a small bicycle hand pump, which is what I carry on the road. Thanks, but I'd rather trust my tube patches and mounting skills over the Tubliss system, which relies on a several finicky elements all working together perfectly.
4. Less weight with tubes. Although I didn't weigh the Tubliss vs. inner tube, clearly the combination of Tubliss tire, Tubliss inner tube, wheel weights, and bottle of slime per wheel exceeded the weight of a standard inner tube.
Conclusions
I never got the chance to try the Tubliss at low pressures, where they probably work well. I just didn't feel confident about risking tire or wheel damage at low pressure on some remote trail. Also, since most of my trail rides entail a long (50km) approach on paved roads, stopping to re-inflate afterwards would be necessary and time consuming.
KISS principle: tubes are simple to repair/replace. Combined with some Stans (not Slime!) for resistance to thorn punctures, they perform just fine for my type of 50/50 riding. In the end, I never really felt confident with the Tubliss system. However, I'd have no problem installing them on a pure trail bike.
1. Balancing is a pain. Tubliss is intended for off-road use, and the reason probably boils down to balancing the rim lock and heavy hardware for higher speeds. Provided you're not racing at high speeds, where tire heat may cause problems with the inner tube, there doesn't seem to be any reason why the Tubliss shouldn't be fine on-road except for balancing. I found that over 50km/hr, vibration on the front was a real issue (especially on long rides!) despite adding a whole lot of wheel balancing weights. Couldn't tell if the back wheel was also a problem. It just became too much for me, and no reasonable amount of Slime or weights made it tolerable.
4. Less weight with tubes. Although I didn't weigh the Tubliss vs. inner tube, clearly the combination of Tubliss tire, Tubliss inner tube, wheel weights, and bottle of slime per wheel exceeded the weight of a standard inner tube.
Conclusions
I never got the chance to try the Tubliss at low pressures, where they probably work well. I just didn't feel confident about risking tire or wheel damage at low pressure on some remote trail. Also, since most of my trail rides entail a long (50km) approach on paved roads, stopping to re-inflate afterwards would be necessary and time consuming.
KISS principle: tubes are simple to repair/replace. Combined with some Stans (not Slime!) for resistance to thorn punctures, they perform just fine for my type of 50/50 riding. In the end, I never really felt confident with the Tubliss system. However, I'd have no problem installing them on a pure trail bike.
Monday, June 30, 2014
Clyde Forks mine
Just west of the abandoned K&P rail line near Clyde Forks, in Lavant Township, is an abandoned mine site with workings in remarkably good condition. Getting there is fairly straightforward and involves a bit of GPS work to find the precise location in the bush. However, I will not provide details here since it's not exactly safe to rummage around old mine sites without taking proper precautions. Experienced mine hunters will know what I mean and will also know how to find this particular mine without problem.
The Clyde Forks Deposit was first staked by "T. Caldwell" in 1918-1919. I'm guessing this was Thomas Boyd Caldwell (who went by "Boyd"). His father (also Boyd Caldwell, just to keep things confusing) had, in January 1880, opened what became known as the Wilbur mine on the K&P south of Clyde Forks. As a widely invested entrepreneur and member of federal parliament, T. Boyd himself most likely remained in Ottawa or his Lanark riding sipping Scotch, while his hapless minions tramped around in the bush on his behalf doing the actual exploring.

As readers of my Wilbur posts will know, the geology along the K&P line is notable for its many mineral deposits--in particular of iron ore--and the region was surveyed extensively in the late 1800s and early 1900s for mine development potential. Other local deposits of interest include silver, gold, copper, antimony, mercury, and barite--all of which are found to some degree in the calcitic marbles at the Clyde Forks Deposit.
Now, before you grab a pick and rush into the bush, it's important to note that mineral claims are well staked across the region, including at this site. While I haven't checked exactly who currently owns the lease on this mine site, two claims were staked as recently as 1984 and probably remain on the books. Indeed, significant copper-antimony-mercury-silver-barite mineralization was identified at the site around that time. However, the deposits probably do not warrant commercial exploitation, which leaves this site as another interesting footnote in Lanark County history.
As Dr. Steve Brule says, "Check it out!"
The bush road leading to the mine site is overgrown, mud-holed, and rife with mosquitoes. Rather than ride it, I parked at a logging staging area and hoofed in the last few hundred metres with my GPS. The terrain in this area is lumpy and steep, with rocky outcrops and mixed hardwood forest. Not the easiest terrain to ride or hike across. I certainly feel for the surveyors who first came out here with chains and transits to take a bead on a claim.

Eventually you reach a clearing on crushed stone where it's obvious some kind of industry occurred. Here, the broken calcitic marble has not had time to weather and it stands in stark white contrast to the mossy rocks and general gloom in the surrounding woods. A campfire that seems to get regular use sits in the middle of the clearing.

On one side of the campfire is a large pit in the undergrowth. Some research identifies this as a test pit dug (probably by T. Caldwell's crew in 1918) to expose a mineralized barite vein. In fact, signs of several other test pits and trenches are visible in the immediate area. One carload of crude material from these pits was reportedly shipped to the U.S. for analysis.

Back on the opposite side of the campfire, a cool breeze emanates from a dark shadow behind the spruces. A closer look, and there is is: the mine entrance, or adit, at the base of the rock face--complete with a modern non-stick frying pan for intrepid visitors. Obviously this site sees regular visits.

The timbering at the entrance probably dates from 1969-1970, when the main exploration of the site was undertaken to assess the mineral potential. The location of the adit and the generally dry conditions in the area have helped to preserve the wood. Indeed, it looks to be in good condition, although I wouldn't bang on it. The rock appears to be very solid as well. A quick look inside is probably statistically safe.
My headlamp did nothing for me, since my eyes had insufficient time to adjust and I didn't think it was wise to hang around in the tunnel until they did. So I only looked in a few metres and took some pics with my iPhone on flash.

The workings are quite small. The tunnel extends straight in about 50 feet, bends slightly left and then proceeds about another 70'. At the bend a drift extends to the left about 15'. Twenty feet past the bend, a second drift extends left about 10 feet. The records (as shown in the pic below, taken from a petrographic study of the site [1]) indicate that grab samples of the barite were taken on the left wall near the tunnel entrance, near the end of the first drift, and near the end of the adit. The barite vein is apparently fairly obvious in these locations, although I was not equipped to identify it during my visit.


The petrographic study of the site [1] provides an interesting discussion of the mineral potential:
"An important feature of the property is the potential for gold mineralization in addition to the knownCu-Ag-Sb-Ba-Hg deposit.
"The prospect is similar to several marble-hosted, disseminated, gold-pyrite-tetrahedrite showings in the area [...] Gold mineralization, at these occurrences, appears to be related to the degree of pyritization and/or silicification in marble host rocks.
"In terms of the overall geochemistry and style of mineralization, the Clyde Forks Property is generally analogous to many large disseminated gold deposits in North America [...] such as Carlin, Cortez and Getchell in Nevada."
So, there we go: Once again, the marble geology of Lanark County provides an interesting dualsport adventure. And a connection to Nevada, no less.
References
1. Petrographic Study, Clyde Forks Deposit, Lavant Township, Southeastern Ontario. Jurate Lukosius-Sanders. June 1987.
The Clyde Forks Deposit was first staked by "T. Caldwell" in 1918-1919. I'm guessing this was Thomas Boyd Caldwell (who went by "Boyd"). His father (also Boyd Caldwell, just to keep things confusing) had, in January 1880, opened what became known as the Wilbur mine on the K&P south of Clyde Forks. As a widely invested entrepreneur and member of federal parliament, T. Boyd himself most likely remained in Ottawa or his Lanark riding sipping Scotch, while his hapless minions tramped around in the bush on his behalf doing the actual exploring.
As readers of my Wilbur posts will know, the geology along the K&P line is notable for its many mineral deposits--in particular of iron ore--and the region was surveyed extensively in the late 1800s and early 1900s for mine development potential. Other local deposits of interest include silver, gold, copper, antimony, mercury, and barite--all of which are found to some degree in the calcitic marbles at the Clyde Forks Deposit.
Now, before you grab a pick and rush into the bush, it's important to note that mineral claims are well staked across the region, including at this site. While I haven't checked exactly who currently owns the lease on this mine site, two claims were staked as recently as 1984 and probably remain on the books. Indeed, significant copper-antimony-mercury-silver-barite mineralization was identified at the site around that time. However, the deposits probably do not warrant commercial exploitation, which leaves this site as another interesting footnote in Lanark County history.
As Dr. Steve Brule says, "Check it out!"
The bush road leading to the mine site is overgrown, mud-holed, and rife with mosquitoes. Rather than ride it, I parked at a logging staging area and hoofed in the last few hundred metres with my GPS. The terrain in this area is lumpy and steep, with rocky outcrops and mixed hardwood forest. Not the easiest terrain to ride or hike across. I certainly feel for the surveyors who first came out here with chains and transits to take a bead on a claim.
Eventually you reach a clearing on crushed stone where it's obvious some kind of industry occurred. Here, the broken calcitic marble has not had time to weather and it stands in stark white contrast to the mossy rocks and general gloom in the surrounding woods. A campfire that seems to get regular use sits in the middle of the clearing.
On one side of the campfire is a large pit in the undergrowth. Some research identifies this as a test pit dug (probably by T. Caldwell's crew in 1918) to expose a mineralized barite vein. In fact, signs of several other test pits and trenches are visible in the immediate area. One carload of crude material from these pits was reportedly shipped to the U.S. for analysis.
Back on the opposite side of the campfire, a cool breeze emanates from a dark shadow behind the spruces. A closer look, and there is is: the mine entrance, or adit, at the base of the rock face--complete with a modern non-stick frying pan for intrepid visitors. Obviously this site sees regular visits.
The timbering at the entrance probably dates from 1969-1970, when the main exploration of the site was undertaken to assess the mineral potential. The location of the adit and the generally dry conditions in the area have helped to preserve the wood. Indeed, it looks to be in good condition, although I wouldn't bang on it. The rock appears to be very solid as well. A quick look inside is probably statistically safe.
My headlamp did nothing for me, since my eyes had insufficient time to adjust and I didn't think it was wise to hang around in the tunnel until they did. So I only looked in a few metres and took some pics with my iPhone on flash.
The workings are quite small. The tunnel extends straight in about 50 feet, bends slightly left and then proceeds about another 70'. At the bend a drift extends to the left about 15'. Twenty feet past the bend, a second drift extends left about 10 feet. The records (as shown in the pic below, taken from a petrographic study of the site [1]) indicate that grab samples of the barite were taken on the left wall near the tunnel entrance, near the end of the first drift, and near the end of the adit. The barite vein is apparently fairly obvious in these locations, although I was not equipped to identify it during my visit.
Near the entrance are some iron rods wedged into holes drilled into the rock. I'm exactly not sure what these were used for; maybe to provide a support for drilling or rock-moving equipment. Or maybe just a handy way to hang the rest of the kitchenware.
The petrographic study of the site [1] provides an interesting discussion of the mineral potential:
"An important feature of the property is the potential for gold mineralization in addition to the knownCu-Ag-Sb-Ba-Hg deposit.
"The prospect is similar to several marble-hosted, disseminated, gold-pyrite-tetrahedrite showings in the area [...] Gold mineralization, at these occurrences, appears to be related to the degree of pyritization and/or silicification in marble host rocks.
"In terms of the overall geochemistry and style of mineralization, the Clyde Forks Property is generally analogous to many large disseminated gold deposits in North America [...] such as Carlin, Cortez and Getchell in Nevada."
So, there we go: Once again, the marble geology of Lanark County provides an interesting dualsport adventure. And a connection to Nevada, no less.
References
1. Petrographic Study, Clyde Forks Deposit, Lavant Township, Southeastern Ontario. Jurate Lukosius-Sanders. June 1987.
Subscribe to:
Posts (Atom)