Showing posts with label service. Show all posts

Monday, June 8, 2020

Changing the Tenere 700 rear shock spring

The Tenere 700 is widely reported to have rear suspension that is too soft for all but the lightest riders--never mind those carrying baggage as well. The solution is to install a stiffer shock spring in the range of 80-95 N-mm vs. the stock 69 N-mm. For details on what size spring to choose, check out Motorcycle Adventure TV's excellent and informative episode on tuning the Tenere suspension. It's a must-watch for anyone who wants to get the most out of this bike.

Having ordered an 85 N-mm spring from Rally-Raid for myself, the challenge became how to install it. Removing the rear shock assembly is actually pretty easy and takes less than 10 minutes:

  • Support the bike under the skid plate, leaving the rear wheel just kissing the ground.
  • Remove the small triangular body panels on the left and right sides (3 x M6 bolts each)
  • Remove the plastic mud flap between the wheel and the swingarm (2 x M6 bolts)
  • Remove the nut from the bolt holding the bottom of the shock piston to the linkage. It's a 15mm nut and 17mm bolt head. Tap out the bolt with a rod; you may need to wiggle the swingers to relieve a bit of pressure on the bolt.
  • Remove the nut from the upper shock bolt (19mm socket). Tap out the bolt with a rod while holding the shock from behind.
  • Remove the shock by lowering it into the swing arm and pivoting it up over the rear wheel. 
That's it! No removing the exhaust, disconnecting the whole linkage, or removing the wheel, as described in the service manual procedure.

After unsuccessfully trying an automotive spring compressor that just didn't fit the small diameter motorcycle spring, I found the ratchet strap method worked to compress the spring just enough to slip out the retainer. The ratchet strap method is probably fine for the stock spring's stiffness. But even with a third ratchet strap, it was no match for the force needed to compress the 85 N-mm spring to reinstall it safely. That 23% extra force of the stiffer spring left the straps rock-hard and probably at their safety limit. (Consider you need to compress the spring about 15mm to get enough clearance, which means applying 1275N or about 130 kg or 286 lbs of force. However, friction between the straps and coils probably doubles the force you need to apply.) Also, it proved impossible to steer the spring concentric with the piston so I could even attempt to insert the retainer. It just wasn't worth the risk of an explosive release if something failed. Time for a real spring compressor.

After calling around to six bike shops and powersports dealers, all were either unwilling to help, were backed up for weeks with other jobs, or simply didn't answer the phone. Amazingly, Canadian Tire was willing to give it a go, and their service department was open until 9 pm. They said it was a bit tricky to fit the smaller shock assembly into their strut compressor, but luck prevailed. 20 minutes and $40 later, my spring was mounted. Cheaper (and safer) than all the options I evaluated online. Point is, if you've run out of conventional options, try the unlikely options because you might get lucky.

Reinstalling the shock is the same steps in reverse; another ten minutes. Note that on the top bolt, there's a metal bracket to slip over the bolt end before you put on the nut. When fitting the bottom bolt, it helps to wedge a crowbar or piece of plywood under the rear tire so you can lever it up a smidge to align the shock and linkage holes. Torque both the upper and lower shock nuts to 45 N-m (33 lb-ft) as per the service manual spec. 


Now to see how that new spring rides!

Sunday, January 20, 2019

Measuring motorcycle chain wear

According to my service records, I installed a new Regina 520 Z-Ring chain on my WR250R in March 2017 at 21,000 km. My odometer now reads about 38,000km on the same chain. In that distance I've completed many muddy backwoods rides, long highway rides, and a 7,500km ride down the Continental Divide--all with a loaded bike.


Nevertheless, after 17,000 kms, this chain hardly shows any wear other than some cosmetic polishing. It has no stiff links, and there's a consistent mild resistance when bending the chain (as in a new chain), indicating that the Z-ring seals are all still good. Here's the outside after cleaning with mineral spirits:


And here's the inside (left) and outside (right).


My maintenance ritual has been a daily brushing with a nylon motorcycle chain brush ($10 online) to remove trail grit, then spraying with a paraffin-based chain lube while the chain is still warm from riding. The paraffin builds a tenacious Cosmoline-like layer on the chain that repels water-blasting even in heavy rain. This routine has rewarded me with no significant wear of chain or rear sprocket (a Dirt Tricks sprocket--awesome quality), although I've had to replace several front sprockets which is to be expected. Previously I used Dirt Tricks front sprockets, but when I was not able to get a replacement in time, I thought I'd try Renthal sprockets at half the price, and was pleased to see a good 8,000+ km out of one before it needed replacing. I'll probably stick with the Renthal counter sprockets from now on, as they are cheaper and more easily available, and I don't see a significant wear or running advantage over Dirt Tricks.

Dirt Tricks has a great guide to measure your chain wear. I didn't want to disconnect my master link, so I measured 50 spaces between pins and got exactly 31.25", which is exactly half of the 62.5" you should measure for 100 spaces on a brand new 520 (5/8" pitch) chain.

I was surprised by the lack of chain wear and at this rate will likely get another good season out of it before it needs replacement.

Sunday, April 8, 2018

Carbon wheels on the 29er


With temps still hovering around the -2C mark, a fat bike with a crapped-out rear hub that can't be fixed (requiring a frame replacement; long story), and a refreshed motorcycle chomping at the bit for warmer days, I've almost run out of things to putter on in the shop. After my last trail ride in the fall, my 29er just sat as it came off the bike rack--much to the surprise of a riding buddy who dropped by. He knows me as someone who meticulously maintains my gear, and here was my sweet ride, all covered in filth.

Time for a rebuild. After a complete strip to bare frame, which I cleaned and waxed, each part was cleaned, inspected, and serviced; suspension disassembled and oil changed; and wheels taken apart with all the old tire sealant cleaned out. The XM401's I built a couple seasons ago have held up perfectly, but I also built a second set of carbon wheels with my own Rugged Wheels premium asymmetric rims last winter, on a set of 28-hole DT Swiss 240 hubs with straight-pull DT Comp spokes. Swapping to these carbon wheels shaved a pound off the ride and they feel amazing! Total bike is now 26 lbs for a large frame. Not bad for a 5 year old bike.

I have a few more carbon wheel sets for road bikes in stock, selling at a ridiculously low price to clear them out. Wheels and tires are really one of the best upgrades you can make on two wheels, and the performance enhancement is immediately noticeable.

Now to wait for the trails to dry out!

Thursday, March 29, 2018

WR250R cam chain tensioner replacement


Towards the end of last riding season, I noticed that when starting my WR250R (2008) after it had been sitting for a while, it made a metallic clattering sound from the area of the cylinder head. The jangling lasted only a few seconds before fading away to the usual, quiet putt-putting sounds. Some Googling of the symptoms and a little intuition led me to suspect that the cam chain was loose, causing the noise. As engine oil pressure built and fed the oil-assisted automatic tensioner, it would take up the cam chain slack and cause the noise to quickly fade away.

The tensioner protrudes from the engine case right above the starter motor, and right below the cylinder head.


The automatic tensioner contains a spring and a winding mechanism, and is supposed to retain tension on the cam chain after the engine is shut off. However, something must not have been working right with this mechanism, allowing it to slowly lose tension over time until returning oil pressure could make up the difference again. I suspected a weakened spring or binding of the mechanism.

Apparently, this is a known problem with some WR250Rs and can eventually lead to the chain skipping and losing cam shaft timing. Yamaha seems to have issued a recall for the problem around 2010-2012, in which they replaced the automatic tensioner. However, I wasn't aware of this recall, so I was left with two options to fix it myself: (1) order a replacement tensioner from Yamaha; or (2), install an aftermarket manual tensioner. Although I've read many positive comments about manual tensioners, I  wasn't keen to go that route. Further digging found that Yamaha issued a new tensioner part number around 2012, which hopefully solves the problem. I decided to order the new tensioner. Worst case, I'll get 27,000 km out of it--just like I did with the first one.

The original Yamaha part number for the automatic tensioner assembly is 3D7-12210-00-00. The newer version is 3D7-12210-11-00, which I ordered from Babbitts Online along with a new fibre gasket.

You'll also need to replace the copper gaskets/washers under the M6 bolts, as they are well crushed from the original installation and shouldn't be reused. These gaskets are the same type as used on the coolant drain M6 bolt and are approximately 11.5 mm diameter with a 6mm hole. The Yamaha part number is 90430-06014-00, and the same part from Honda is 90463-ML7-000. You may also be able to find them at a specialty fastener or auto parts store.

Here's the full assembly (my old one):


So, how to replace this thing?

Initially, the job may seem rather intimidating, but it's actually not too bad and could be done in an evening or two assuming you have all the parts and nimble fingers. No fancy tools are required, although it helps to have various lengths of 8mm sockets and drivers. If you're super careful, you could probably replace the tensioner without removing the valve cover, but I opted to take this opportunity to check the valve clearances and inspect the cam chain in case my original assumptions about the tensioner were wrong. I also decided to replace the cooling hoses, since I would need to drain the coolant anyway. The original hoses, while seeming to be in good condition, are now 10 years old and my bike will be called upon to withstand desert heat this summer. I'd rather take my chances with new hoses so I ordered the DRC kit.

The following steps are adapted from various internet sources and are meant to complement the Yamaha WR250R shop manual. I won't replicate what other sources explain; I'm just adding some points to help clarify or simplify. These steps assume you've already removed the seat, side panels, and gas tank.

Before you unbolt anything
1. Disconnect the battery and remove the ignition key. This will prevent you or some "helper" from accidentally trying to start your bike until you've completed and double-checked your work.
2.  Unscrew the circular covers for the crankshaft and generator rotor on the left side so you can access the crankshaft bolt and find the TDC mark on the generator.
3. Using a socket wrench on the crankshaft bolt, and while looking through the generator hole with a flashlight, slowly turn the crank counterclockwise until the TDC mark (a single engraved line) aligns with the mark on the view hole. (Note that the TDC mark is just clockwise of an engraved "H" mark on the generator, which indicates the ignition point.) Aligning TDC now will save you some hassle later.


Now you need to clear a path to access the two 8mm bolts that secure the tensioner to the cylinder head. This means removing the starter and some other stuff.

Remove the tensioner
4. Remove the exhaust header pipe.
5. Loosen the muffler from its frame bolts. You don't need to disconnect the EXUP valve actuator cables on the muffler. You should be able to just swing the muffler out of the way of the starter bolts and hold it to the frame with some wire, while being careful to not crimp the cables.
6. Disconnect the electrical wire on top of the starter. The rubber boot just pushes up out of the way. The boot may be full of crud, so get a toothbrush in to clean it out.
7. Unbolt and remove the starter by pulling it straight back. Be careful to not allow accumulated gunk to fall into the open hole. Clean all grime off the starter, especially around the O-ring where it mates to the engine case, and on the electrical terminal.


8. Back on the left side of the bike, remove the actuator mount for the clutch cable. It'll facilitate accessing the lower tensioner bolt, and you might as well inspect and clean the clutch actuator while you're in there.
9. By now you should be able to loosen the two bolts holding the tensioner. Note that the tensioner will be trying to push itself out of its mounting position because of its internal spring. The two bolts are installed with crush washers and may take a bit of force to crack loose.

At this point, you could jump to step 21 and install the new tensioner. However, there's a risk you may inadvertently allow the cams to skip out of correct timing when re-setting the tensioner against the chain, which would mean having to remove the valve cover to check and reset the timing. That would be a hassle, so I recommend just carrying on with removing the valve cover, which can be done from the right side if you clear a path as follows.

Remove the valve cover
10. Drain the engine coolant. As noted above, the water pump drain bolt uses the same size crush washer as the tensioner.
11. Unbolt the metal clip that holds the coolant hoses to the frame next to the radiator (it also secures the radiator to the frame), then disconnect the hoses from the rad and gently bend them down and out of the way of the valve cover area.
12. Remove the top bolt holding the radiator to the frame, and loosen the bottom bolt. This should give you enough freedom to swing the radiator slightly forward and out of the way of the valve cover.


13. On the left side of the engine and near the top of the valve cover, there's a thick wiring bundle and vent hose zip-tied to a tab on the frame. Cut the zip-tie and disconnect the vent hose from the forward assembly in the left shroud. (By the way, this assembly directs fresh air from the air box into the exhaust port, to assist in combusting unburnt fuel.) Tuck the hose down and out of the way.


14. Disconnect all the electrical plugs (including the spark coil) in the way around the top of the valve cover, and remove the breather hose connected to the valve cover.
15. It's a good idea to now clean the area of debris, blowing it out with compressed air so there's less chance of grit falling into the soon-to-be-exposed cam area.
16. Remove the spark plug.
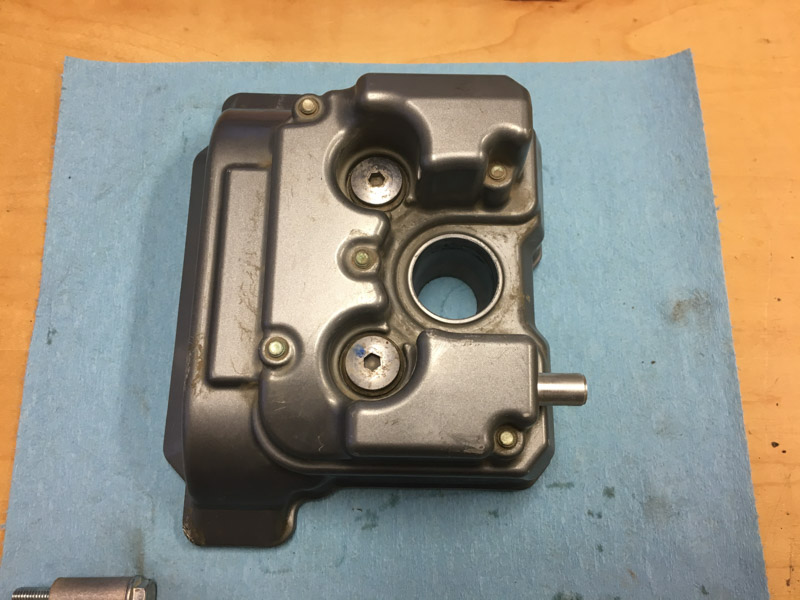
17. Unbolt the valve cover. You should be able to wiggle it up, right, forward, and then rotate it clockwise to get it out of the frame. Mounted on the throttle body is a little vacuum widget that looks like it will block the cover, but you actually do not need to remove this part and can wiggle the valve cover around it. In the picture below, I've already removed the valve cover, but the widget is the thing with two Phillips (actually JIS) screws and two hoses going into it.


Check valve clearance
Now the valves are exposed, and you can check clearances with feeler gauges. The clearance specs are:

Intake (rear of bike): 0.13-0.20 mm (0.0051 - 0.0079 in)
Exhaust (front of bike): 0.23-0.30 mm (0.0091 - 0.0118 in)

I was able to easily insert a 0.10 mm feeler under the intake cams, but a 0.15mm feeler was tight, indicating they were probably right on spec around 0.13 mm.

The exhaust cams were easy with a 0.20 mm feeler, but very tight with a 0.25 mm feeler. So, probably a bit too tight vs. spec, but that's how it came from the factory and 27,000 km later it's running fine, so I'm not going to change anything.          

Confirm your cam timing
18. With the crank at TDC (you can double-check TDC by looking in the spark plug hole and confirming the piston is up), check the timing of the cam shafts: the correct position is with the lobes facing away from each other, and the timing marks on the cam gears parallel with the top edge of the cylinder head. Note that it is surprisingly easy to skip the timing chain on the cam gears, so you definitely want to confirm the positions before reinstalling the valve cover.


19. If you need to adjust the cam timing, first loosely slip a wire under the timing chain and loop it over the frame to prevent the timing chain from dropping into the case. Then rotate the left (exhaust) camshaft into position first, then rotate the intake (right) camshaft. I used a dental pick to hold up the timing chain over the teeth, making it easy to rotate the cam gear.
20. Double check the position of the TDC mark down in the generator hole. At this point, everything should be perfectly aligned.

Reinstall the tensioner
21. First you need to compress the tensioner piston and lock it into place. You can do this by squeezing it between your thumb and fingers, with the piston end at your thumb, while rotating the body of the tensioner (the piston only retracts with a winding motion). Once the piston reaches the bottom, hold it there and gently squeeze the little wire clip at the end to lock it into the groove, and gently release your thumb pressure. The piston should stay in place. If this method proves too tricky, you can gently squeeze the piston in a non-marring vise. Note that applying slight pressure to the end of the piston releases the wire clip and allows the piston to extend--you'll need to do this after re-installing the tensioner.
22. Insert the tensioner into the engine case, using a new gasket if necessary (wasn't in my case) and install only the front mounting bolt, using a new crush washer. Snug the bolt just past finger-tight, but not so you crush the washer. Depending on how setting the tensioner goes in a moment (e.g. if you goof up and jump the timing chain), you may need to remove and reset the tensioner, so using just one bolt to hold it in place will avoid a lot of fiddly frustration.
23. Now you need to release the tensioner piston so it presses firmly against the chain guide and takes up the slack in the timing chain. The trick is to do it without skipping the chain: hold the left (exhaust) gam gear firmly with your left hand, and slowly turn the crankshaft counterclockwise while keeping hand-pressure on the chain. After about half a revolution of the crank, the chain should tighten up enough that you hear a slight "click" as the tensioner release the piston, and it'll be obvious to see the chain slack slowly disappear.
24. Carefully turn the crank by hand counter-clockwise over a few revolutions to confirm that the TDC mark and cam timing positions are correct, and chain tension is firm. In my case, after setting the tensioner I found that both of my cam gears were just slightly off horizontal by half a tooth, even though the TDC mark was in the right place. This appears to be within normal tolerances, as experimenting with moving the cams by a tooth either way to try to correct the angle only made it worse.
25. Install the second tensioner bolt and torque both bolts to 10 N-m.
26. Inspect the valve area for debris. If there's any grit, wipe it away carefully.
27. Reinstall the valve cover. The manual says to replace the valve cover gasket, but if it's clean and in good shape, you should be able to re-use it without issue. For extra security, I ran a thin bead of silicone gasket sealer (Hondabond HT) on the underside of the gasket before mounting it back on the head.

Reinstall all the other bits by following the instructions in reverse order.

It's a good idea to change the oil after this procedure, to flush out any grit that may have fallen into the valve area.
 
I'm happy to report that after reassembling my bike, it fired up perfectly the first time and purred like a kitten. The start had none of the jangly sound that set me on this service path, and the engine just sounds really good.


As a footnote, I disassembled the old (left) and new (right) tensioners to see if I could notice any differences.


Other than the date code and part numbers on the case, the parts seem identical, although the new tensioner is noticeably easier to compress the original one.

Wednesday, February 21, 2018

Inspect your wheel bearings!

Last winter I built up a set of burly new wheels for my WR250R using SM Pro hubs, Bulldog stainless spokes with aluminum nipples, and SM Pro rims. While the combination was almost identical in weight to the WRR's stock wheels, the heavier spokes and higher tensions translated into noticeable handling improvements and the larger bearings of the SM Pro hubs (in theory) should have improved durability.

So, while tearing down my bike recently for a pre-season inspection, I was surprised to discover that one the rear wheel bearings had completely seized despite there being no obvious signs of damage to the bearing itself, although the end cap showed some suspicious, uneven scoring past the seal.

The OEM rear hub uses one 6005 bearing on the drive side and a smaller bearing on the brake side. Here's the bearing replacement kit for the OEM hub. The loose bearing lying on top is also a 6005.


By comparison, the SM Pro rear hub uses three 6005 bearings: two on the drive side, and one on the brake side. It was the inner bearing on the drive side that had seized, which struck me as the least likely bearing to fail unless there was some sort of manufacturing defect. True, these wheels saw some wet conditions last year, but after only 7,000km I wasn't expecting a seized bearing. The outer bearing on the drive side showed some corrosion but remained buttery smooth, as did the bearing on the brake side.

Here's the brake side of the SM Pro hub, with external seal removed:


And here's the drive side:


Removing the SM Pro bearings is relatively straightforward using a drift to knock aside the inner spacer tube and then tap out first one side, then the other, by driving on the inner races.

Rather than buy Moose or All-Balls replacements, for about the same price (or less) I picked up some better quality SKF bearings and seals from a local distributor. The 6005-2RS is a common part used in many industrial and recreational applications, so you can get them pretty much anywhere--including where sleds and ATVs are sold.


Installing new bearings was equally straightforward once I found a 34mm socket to use as a driver. I would've made a tool, but didn't have any rod stock in the required diameter. Sometimes buying a socket is good enough.


With new end-caps installed, the wheels feel buttery smooth again. Here are the old ones showing part numbers:


The lesson here is to not assume that even relatively new bearings are still good, and to check them all carefully before heading out on your next adventure.

Sunday, June 4, 2017

Rugged Wheels on Facebook


Just launching a Facebook page for my custom wheel building business, Rugged Wheels. Been busy with customer orders and testing new products over the last few months. I'm selling sample wheel sets at a considerable discount. These reflect combos I built up as part of setting up my ordering system, tooling, etc. All are ready to ride and in new condition, although some may have very minor cosmetic flaws that won't affect performance/durability. Will also be listing some slightly-used odds and ends that I tested along the way. Gotta clear out the shop for more stuff!

Dualsport Diary will continue to be where I post articles and reviews.

Thursday, April 13, 2017

Road wheel upgrade: DT Swiss 350 hubs with RR411 rims

In 2003 I had the good fortune of being able to order my first full-custom road bike, where price wasn't the main consideration. After test-riding various options in titanium, carbon, and aluminum frames, I decided on a Canadian-made Marinoni Delta Xtra built around a Columbus Airplane tube set with a Columbus carbon fork and rear triangle, DuraAce transmission and brakes, FSA carbon cranks, bars, and seat post, and a set of Mavic Ksyrium Elite wheels. Custom painted and decaled in Ferrari red, it was a pretty trick bike for the time, weighing a respectable 17 lbs for a 58cm frame. Since then I've ridden it thousands of kilometers each year, getting in long slow mileage to build fitness base.


Here's me with Guiseppe Marinoni, the legendary frame-builder who made my bike in his Montreal shop, just before a ride in 2016. Pepe was in Almonte to promote a film about his extraordinary career, called "The Fire in the Frame". It's a must-see, even if you're not much of a cyclist. Pepe holds the world hour record for his age, so it was a real honor to ride with him (and keep up!) on a short tour around the local countryside.


Anyway, all this to say that those lovely Ksyrium Elite wheels, despite having performed flawlessly through my abuse over rough country roads, are finally showing their age. Tonight's inspection revealed two fatigue cracks in the rear rim at the nipple holes. Not surprising: this gracious warning is how you want your wheels to fail, rather than via some catastrophe that ends in a hospital holiday.


These are finicky wheels to build and service, and parts ain't cheap. So it was time to decommission the Mavics. Maybe they'll become a winter rebuild project.


Fortunately, I recently built a set of road wheels for a customer and thought it would be a good idea to build a second set at the same time, just in case I needed them myself:


These wheels consist of DT Swiss 350 straight pull hubs laced to DT Swiss RR411 rims with DT Comp spokes and ProLock aluminum nipples. 24 spokes up front and 28 in the rear. Weight is 710g front, 900g rear--just 40g more than the Ksyriums but at about 1/2 the price. Also, they are a tubeless setup. With 25mm tubeless tires and DT skewers, final weight is comparable to the Kysyriums running 23mm tires with tubes.


Unfortunately, I discovered that the rear clearance in my frame is probably too tight for a 25mm tires,  so for now I'm running a 23mm in the rear and 25mm up front.


A short test ride shows they ride flawlessly and are holding air well. A little more shaking with sealant and they should be good for a long ride this Easter weekend. Weather even looks great! 

Update (next day): Went for a 20km test ride and found the Continental 4000 really doesn't like to hold air. Back wheel was fine (used a different tire), but the front leaked like a sieve when I checked it under water. Couldn't get it sealed so reverted to tubes. Will need to research a tubeless-ready tire. At least the valve stem and rim area sealed perfectly. 

Coming soon: I've placed my next order for my Rugged Wheels custom carbon rims and will be building some slick 29er wheel sets for mountain biking, using 350 hubs and an asymmetric profile.

Sunday, February 12, 2017

14T vs. 13T countersprocket on WR250R (updated)

Stock gearing is 13/43 on the WR250R. I've been running 13/47 with good results, and thought that bumping to 14/48 would give better highway performance while leaving the easy option to swap to a 13/48 for dirt use without requiring much chain adjustment.

Unfortunately, a 14T with chain leaves uncomfortably low clearance on the bike if also running with a case saver like the one I made.

Here are pics of a new Dirt Tricks 14T compared to a worn 13T. I'll be sticking with 13T and have opted for a 45T sprocket on the wheel to test with some Mitas E-07 tires that I'll be testing this year.


Here's view of the 13T with 48T rear sprocket with new chain mounted to show clearances. It's a bit tighter on the rear than I'd prefer, and I expect the guide will show accelerated wear. May need to look for aftermarket sliders and guides made from harder material and with more clearance. 


Note: Yes, I had a brain fart and accidentally installed the quick link clip backwards (closed end should face chain direction). I fixed it after taking this pic.  


Custom bicycle spokes


One of the latest additions to my shop is a gorgeous Morizumi spoke machine. This elegantly designed and made tool allows me to cut and thread custom spoke lengths, an important capability when building wheels as so many different lengths are needed. As part of this toolset I also acquired a Mitutoyo digital tensiometer which has demonstrated excellent measurement consistency in wheel building.


Cut and thread quality with the Morizumi is actually superior to that on OEM spokes I've inspected, although there's a bit of an art to set up and use the tool. 


Here's a sample of spokes threaded while experimenting with different techniques. The curvature is optical distortion from the jeweler's loupe positioned in front of my cell phone lens--not an actual bend in the spoke. 


Here's an almost perfect thread in a 2.0 mm straight-gauge, stainless steel DT Swiss spoke. The Morizumi applies about 9-10 mm of thread. 


And here's a sample board I made up while trying different threading techniques and set-ups. Once it's dialed, each spoke comes out perfect.


As part of my Rugged Wheels business I offer custom spoke cutting services. Unless they are obviously damaged, most spokes can be safely re-used as-is, or cut down and threaded for a different application. This is certainly cheaper (and faster) than ordering new spokes only to find they may be the wrong size!

Unfortunately there isn't a comparable machine for motorcycle spokes. However, I do have access to the full catalogue of Bulldog Spokes from Central Wheel Components in the UK. These are among the best in the industry and what I use to build moto wheels.

Saturday, December 17, 2016

Rugged Wheels update and preview

Rugged Wheels is my new business venture born in the woods of Eastern Ontario, a destination with thousands of square kilometers of gorgeous wilderness for epic rides on and off road.

Why Rugged? Because out here, buff trails are the stuff of fantasy. Here we contend with Canadian Shield, limestone flats, dismal swamps, rooty cedar and pine forests, sticky clay, water crossings, and pointy rocks everywhere.

The lightest gear is no use if it breaks. Even on a road ride here it can be a long hike back to civilization and you can't count on others along the way. So our wheel vision emphasizes quality and durability: built to service, built to last. Rugged Wheels for rugged rides.  

For the last couple of months I've been spec'ing wheelsets, ordering parts, and building wheels in preparation to launching my web site. Here's a preview of some of the goodies.

The following are custom carbon rims, all for tubeless mounting and built on DT Swiss 350-series hubs. There's an 80mm-wide fatbike rim, a 38mm deep road rim, and a 60mm deep road rim. The road rims are 25mm wide to allow for wider (e.g. gravel) tires and include a rim braking surface, although I'll be building these up for disc brakes. I'm also looking into an option for a more discreet rim graphic, but hey--these are meant to show off the brand!


Here's the 3 Amigos together for comparison:


Light dual-sport motorcycles like the WR250R, CRF250, and more are rightly gaining popularity. Upgrading the wheels or having a second set with different tires improves the ride experience. Here's the set of SMPro wheels I built for my WR250R, mounted with an MT-21 in front and D606 in back. Hubs and rims are SMPro with Bulldog stainless spokes and aluminum nipples. Everything is made by the same company in the UK--they supply wheels to many well-known factory brands in Europe. 

Ignore the ghetto balancing weights. The nice ones I had in stock didn't fit the slightly larger Bulldog spokes, so I need to order new weights. 

Note these wheels look a little grungy because they have 500km of trail riding on them, and the tires have about 2000km.  


The hubs have a nice, clean design, include spacers and bearings, and build up well.


Here's a close-up of the Dirt Tricks sprocket I've run for 13,000 km of filthy trail riding. 


It shows no functional wear compared to a brand new sprocket on the right. Amazing. 


Like DT Swiss on the bicycle side and SMPro on the moto side, Dirt Tricks is a brand I've chosen to import because it's such good stuff.

I also rebuilt my stock WR250R hubs with new SMPro rims and Bulldog spokes to be able to run a more street-oriented tire. 


The real show here is that zirconium PVD-coated sprocket from Dirt Tricks. This coating is expected to be more durable than the chromium plating on the regular sprockets. Colours look amazing when you change the lighting angle. 


Rugged Wheels will offer these products and more in 2017:
  • Wheelsets for bicycles and motorbikes. These are sold as predefined upgrade packages based on carefully selected components and sizes that are most popular and optimize performance, durability, and cost. Lightest and cheapest is available elsewhere; that's not our market. Retail sales are through bike shops only. You can order bicycle options from Imad or Brian at Rebec & Kroes in Ottawa. We're interested in hearing from motorcycle shops that want to offer wheels and parts for dual-sport and off-road applications.
  • Small parts for wheels. Whether you need hubs, rims, spokes, or other related parts, our plan is to provide sales and technical support. If you've ever tried to spec a wheel, you know there's a lot to figure out. One supplier has over 60,000 SKUs just for wheels...
  • Custom-cut spokes for bicycles. Our Morizumi spoke machine enables us to offer precision-threaded spokes as cost-effective options (order 1 or 500!) for servicing your own wheels.