Tuesday, August 27, 2013

Tatlock marble quarry geology


My post in 2009 about the Tatlock Quarry has garnered more page views than anything else on this blog, so I thought I'd post an addendum with some details about the unusual geology of Lanark County indicated by the quarry. While it's not exactly "dualsport" material, I figure  what the heck. Knowing what you're riding on and through can make any trip far more interesting. Besides, since there are two main geological features that distinguish the Lanark County area, we can pretend for a moment that this is the "dualrock diary". A big thanks to Dr. Paul Keddy's booklet "Earth, Water, Fire: An Ecological Profile of Lanark County" for great insights on the topic.

Geologically, Lanark County is basically distinguished by limestone bedrock in the east and south (think of the Burntlands area just east of Almonte) and Precambrian Shield in the west and north (Mt. Pakenham to Lanark Highlands to Muskoka and beyond). The line between the two regions is visible all the way from Champlain Lookout in Gatineau Park: on the horizon you can make out where the Shield rises from the limestone plain just west of Almonte and forms a ridge running up to Pakenham where the ski hill is located. Behind in the distance is the highlands region. Of course, this is only part of the boundary between the geologies but it's a pretty obvious one to see and a good place to start.

What's also interesting about this ridge is it was the far shore of the Champlain Sea that filled the Ottawa Valley after the last ice age melted around 12,000 years ago. Where previously there was some 3km of ice stacked onto the Valley, all of a sudden (geologically speaking) there was a vast inland sea connected to the Atlantic via the St. Lawrence valley. Vestiges of former beach areas, raw material created by glacial erosion and now marked by large sandy ridges areas along roads such as the Old Perth Road out of Almonte, can be seen today. Imagine seals, walruses, gulls, and other wildlife basking on these ridges the next time you're motoring down this dirt road!

What does all this have to do with the Tatlock Quarry? Well, the boundary between the shield and limestone bedrock regions is rife with protruding marble formations that resulted from ancient geological processes metamorphosing limestone beds through heat and pressure. You can see the bedding layers of the marble in cross-section at the Tatlock Quarry. Striations and darker bands clearly show how the original limestone layers were gently folded and thrust upward as they transformed into marble over time.


Much of the marble in Lanark County seems to be highly granular and poorly consolidated compared to the fine-grained white marbles from places such as Cararra in Italy. You're going to have a bad time trying to carve an old-world masterpiece from a Tatlock Quarry block. I know a few local stone carvers who've had some success with the odd bit of marble found in the area, but for the most part it seems the main value of the deposits is industrial use. For instance, Omya operates the Tatlock Quarry (and others) to obtain high quality white filler use in paints, plastics, and toothpaste.

Fortunately the marble plays a more important role in Lanark County. First, consider that in the areas of Canadian Shield, soils are thin and acidic. Pine trees love this kind of ecology and, coupled with the relatively warm climate of eastern Ontario and easy water access, it's no surprise that Lanark County was once one of (if not the) richest sources of squared pine logs in North America. In fact, Lanark and surrounding counties supplied some 12 billion squared timber logs that were floated down the Ottawa River and sent back to Great Britain and Europe since the early 1800s. (To be even geekier, it was a lumber baron dispute in Lanark County that eventually led to a law that opened up all Canadian navigable waterways to public access. Previously they were private property and you couldn't simply drop your canoe in and fish for perch.)

Second, consider that the limestone bedrock is practically the opposite of the Shield's granite and gneiss geology. Limestone soils are more alkaline and host an entirely different ecology. For instance, the Burntlands alvar just outside Almonte is host to to rare and unique species found nowhere else. That's why we don't ride our dualsports in the area--it has significant scientific value and we need to protect it.

All those marble deposits play the important role of moderator in the midst of all that hostile Shield. It provides an oasis of more fertile, alkaline soils and resistance to acid rain that together allow more diverse types of forest and healthier wetlands to exist within the Shield regions. The marble areas  provide valuable environments for different fauna to thrive where otherwise they would have a much more tenuous existence. 

The marble areas also give rise to some interesting geological footnotes that result in significant rich deposits of valuable minerals--including iron and silver-bearing ores--to form. One such boundary area gave rise to the banded iron deposits that attracted the Wilbur Mine operation near Lavant Station in the late 1800's. Just up the K&P rail bed from Wilbur, near Flower Station, was a significant deposit of silver. Many other mines and exploratory digs existed in the area. Who knew there was so much mining activity here so long ago?

In summary, Tatlock Quarry can be thought of as a highly visible signpost pointing to many other, lesser known but interesting aspects of Lanark County geology and history. It's discovering and learning about these hidden treasures that keeps me rolling on knobbies out in the bush, putting faces to all those names.

Update August 25, 2014: The quarry is closed to public access. According to the sign barricading the road, apparently some people didn't respect the fence, and trespassed into the quarry.

Update October 5, 2015: Seems like the quarry road is open again, although I haven't confirmed it myself.


Monday, August 26, 2013

Almonte Riverside Trail - trail work days

On Sunday I cleared and pin-flagged another hundred metres or so of single-track extension to our local trail project. We are planning some volunteer trail work days over the next few weeks (and probably on Sunday or Monday of the Labour Day weekend) to continue clearing and start hand-benching the tread.

It's hard work rewarded by the joy of mountain biking a flowy trail through beautiful forest and hidden ravines along the Mississippi River, and the prospect of a cold beer afterward.

Check out the forum on AlmonteOutdoors.ca for more info.

RotopaX rack with tail bag fabrication

Having an extra 3.8L of fuel on the rack has already proven handy, but the pack and mount preclude  using my shiny new tail bag.


The solution was fabricate a nifty swing-out rack to cover the RotopaX and provide a solid base on which to re-mount the tail bag using the original clips I made. The piggy-back rack (piggy-rack?) is made from leftover stainless steel from our old dishwasher fascia (I've gotten a lot of mileage--literally and figuratively--out of this scrap!) and the aluminum bottom plate from what was once the fastest optical networking switch in the world--a $250,000 circuit board that I can't bring myself to throw away. Poetic afterlife for both abandoned appliances.

An important design goal was to keep things really simple: no weird parts; simple construction that can be fixed anywhere with any available hardware, metal and tools; quickly openable to access the RotopaX; and quickly removable altogether without any special tools. After a few minutes of doodling I had a concept, took some measurements, and got busy.

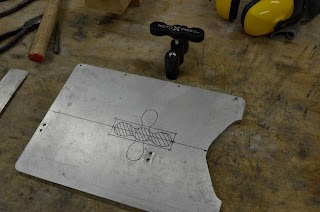
First I made the top plate from the 1/16" circuit board aluminum. I wasn't really thinking this part through: I just traced the original rack and located where the RotopaX mount would potentially stick through. In retrospect, a plain rectangle would work better and the hole was unnecessary.


Now I needed some standoff hinges and this is where the stainless steel came in. From strips sheared by hand, I used a 3/16" steel rod as a mandrel (and future hinge pin) to bend a tab and form the main hinge body. While it looks tricky (the first one was educational), I was able to make three more in about 15 minutes each. All the bending was done in a bench vise by hand and using a ball peen hammer to tap clean edges. Note that the hinges lack cut-outs for the other half; these will be cut later. 


Holes were then drilled through to secure the flap with two aluminum pop-rivets. Although bolts would be stronger, I didn't have any in a convenient size. Pop rivets would be plenty strong enough in this application and there's no risk of something coming loose. In the unlikely event that a rivet fails, it can be dug out with a Swiss Army knife and replaced with any small bolt or even twisted wire or a zip tie.


Dry-fitting the four standoff hinges around the bottom rack and RotopaX revealed a fitment error. I'd aimed for a 1/4" clearance between the top of the pack and the underside of the top plate to allow for manufacturing variations of the packs and distortion from fuel expansion. However, I'd bent all four standoffs precisely at the wrong location. The top plate was too tight on the pack as a result. Oops. Rather than make new hinges, I was able to heat the bends red hot in a propane torch and then gently forge them flat on my anvil. Other than some minor oxidation, this removed most evidence of my blunder while relieving the metal of any work hardening stresses that would likely lead to cracking under road vibration. 


It was then easy to re-bend the hinges in the correct location to get the right standoff height. Fortunately I'd left long enough tails to make this possible! The lesson is to not trim until you're sure about the fit.

Now to make the other halves of the hinges. This was done in much the same manner as the standoffs, using the same 3/16" rod as a mandrel and trimming the final size only once the bending was complete. By this time I was getting the hang of mandrel bending and it only took a few minutes to make each piece. It's important to file the edges square or the next step won't be precise. 


A vague memory of traditional blacksmithing techniques guided the step of scribing and cutting the standoffs to accept the centre hinge pieces. First I cut slots through the barrel with a hacksaw, then I used a Dremel cut-off wheel to slice along the hinge axis and pop out the centre section. Some filework cleaned up the cut and gave a precise fit with just enough play to allow the hinge rod to slide easily. 


Next was dry fitting and drilling hole locations. Unfortunately, my intended locations for the rear hinges wouldn't work because of the large holes cut into the 6mm bottom rack (that's something to fix in v2!). I  had to move them to an inelegant location. I also debated whether or not the hinges should mount to the tops or undersides of the bottom and top rack plates for mechanical durability. For the bottom rack, I decided that having the hinge hidden away as much as possible would reduce the risk of catching it on something. This is also why I decided to mount the centre portion of each hinge permanently on the rack: it was the least intrusive component. They were attached to the 6mm plate with 6-32 machine screws tapped right into the aluminum. The tops of the standoffs were bolted to the 1/16" aluminum top plate with M4 bolts and nyloc nuts.

Eventually I'll replace all the hardware with one standard metric equivalent (probably M4), and rather than use tapped holes for the bottom hinge, opt for a countersunk bolt from above. Again, keeping it simple and standard makes it easier to fix on the trail with simple tools and common parts.

The hinge pins were cut from the 3/16" steel rod. The ends were rounded into smooth bullet shapes on the grinder to facilitate insertion through the hinges. A small hole was carefully drilled through each end to allow for  a safety-pin style retaining clip (which I may wire to the hinge so it can't get lost). This would prevent the pins from vibrating out of the hinges. Both side assemblies are identical and the rack can swing either way by simply sliding out the appropriate hinge pin.


Here's the piggy-rack mounted on the WR. It's really fast and easy to open and close--no tools required!  The whole thing weighs practically nothing. The hinge pins are the heaviest components. 


I was initially skeptical that using such light gauge material would result in a durable design. However, it's surprisingly sturdy and immovable when you consider that the RotopaX itself bears most of the load via the blue pads I made from some old closed-cell sleeping pad material. I intend to make these pads bigger to improve load distribution. Keep in mind that the rear subframe is only rated to about 15 lbs, so it's not like you need to strap a goat on there (unless it's a small one).

Here's the finished assembly. I reused the original stainless steel clips I made for the tail bag straps, bending them higher and slipping a small length of split vinyl tubing over the sharp inside edge to reduce the risk of slicing through the Velcro. This is OK for now, but a sewn buckle system would be more secure and faster to remove.


Overall I'm pretty pleased with how this turned out although getting on and off my bike now requires some acrobatics. As a test mule, the rack really needs to be flogged in the field to see how well it works in practice. Already I have a list of improvements to the base rack, standoffs, and piggy-rack that I may incorporate into a commercial version that can be adapted to different motorbikes. Would you buy such a product? How much would you pay? I'd appreciate your thoughts on that.

Update (April 4, 2014)

Update October 5, 2014

This crude top rack has proven surprisingly durable despite overloading and trail abuse. However, the sideways flip is awkward to manage when the bag is full, so it's time to think about a redesign. Next version may flip forward, so the bag is supported by the seat when accessing the RotoPax. I may also widen the rear rack to provide better access to the side slots for bungie hooks (currently covered by the RotoPax) and room to rig a mount for soft side bags. There's a TIG welder in my near future which should also help me progress my jet engine project.

Thursday, August 22, 2013

Icon Variant helmet review

Few helmet options seem to be available for people whose melons are longer front-to-back, rather than the mythical spheroid shape that 5 year-olds try to draw. My Nolan 102 was aimed at the latter head shape and never really fit me right. Besides creating an uncomfortable pressure point on my forehead, it attracted the mocking of my dear children who likened me to a Playmobil figurine.


Since the Nolan was more than five years old, it was also time to replace it for safety's sake.

None of the convertible options I looked into (including the latest Nolan and Schuberth) fit me very well. Besides, a DS-oriented helmet suggested better ventilation and lower weight at the expense of convertible convenience. Attactive DS options from Arai (XD4) and Shoei (Hornet DS) fit my Nordic head shape rather well. However, they were out of my price range. Also, given the typically low speeds at which I travel and my industry knowledge of helmet testing, I couldn't see a good justification for the additional cost besides style--assuming equal fit for alternatives. 

Then I was recommended to try the Icon Variant by the folks at Ottawa Goodtime Centre. Apparently Icon is the last helmet manufacturer to cater to my head shape. This seems odd given how well the Hornet and XD4 fit my noggin. Whatever; the Variant didn't present any obvious pressure points after wearing it in the store for a while, although the cheek pads were unusually tight and putting it on and taking it off does a number on your ears because of the tight fit. Seemed OK so I ordered one. 


Materials, fit, and finish are excellent. The shell is a fiberglass/Dyneema/carbon fibre composite with dual-density foam lining. The comfort liner is covered in HydraDry material which wicks away sweat towards the ventilation holes. Online reviews suggest it works very well, and indeed I found it comfortable. And there's lots of ventilation! More on that later.  

Colour options for the Variant are pretty interesting and oriented to the Master Chief riding demographic. A gold visor can be ordered to complete the effect. (Camo helmet? Really?) I opted for boring gloss white to improve visibility. It's actually pretty sharp looking in its simplicity and should be cooler to wear at slow speeds.


Tonight's first ride with the Variant revealed some obvious differences versus the Nolan. First is the wind noise. It's not exactly quiet, but the frequency is more of a low roar of wind passing by the helmet rather than through it, which in the case of the Nolan resulted in more high-frequency noise. I find the low-frequency noise more tolerable when not wearing ear plugs, and it allows me to hear the engine and my surroundings better. 

Second is the force imparted by the visor. I'd expected some lift and torque when looking sideways, but not this much. While my WR250R doesn't have a windshield, I was surprised to find how little buffeting the bike presented compared to my KLR with the stock windscreen. I guess the WR angles the wind right up to where the Variant visor is, causing the helmet to torque back slightly. I'll have to experiment with seating position. The lift isn't uncomfortable at 100 km/hr but may become a nuisance at higher speeds, and I found myself adjusting the helmet forward while riding. 

Third, the shield has an impressive anti-fog coating. I rode right after a big evening storm, so the roads were wet and steaming and fog was forming in the little valleys. Perfect conditions for condensation, yet the shield remained clear. I did notice that after a while, headlights and other bright objects acquired a strange halo around them. Especially bright lights created a dangerous washout haze of light that obscured vision. I'm not sure why this occured - maybe some residue on the inside of the shield was the culprit. Inspection later showed an even residue on the inside of the shield, so I washed the visor (dish soap and water only is recommended) and polished it with a soft cloth. Hopefully this was just an out-of-the-box phenomenon and not a regular occurrence. 

Fourth, ventilation performance was really impressive and far exceeded that of the Nolan. Side-checks led to air coming right up to my eyes with the shield fully closed. No dead air space in this helmet! Later I realized that only half the vents were open. More playing around is needed to figure out the right venting combo for different conditions. There also wasn't a chin shield installed. Not sure if one's still in the box, but this will be essential in cold weather riding. 

Initial impressions are positive overall and I'm looking forward to seeing how the Variant performs on a longer ride. At least it doesn't look as dorky as the Nolan: one of my spawn noticed the helmet and even said something like "cool". 


Wednesday, August 21, 2013

Singletrack update - more to ride in Almonte area!


Last weekend we did a long day of work on the Almonte Riverside Trail, benching a further 100m or so of new section at the far end and pulling dozens of stumps. It's still pretty rough and needs a lot of hand-work to tune it for riding, but it is rideable and interesting.

This is by far the hardest section of terrain to develop on our planned route to the Mill of Kintail. However, we're almost at the end of the tricky clay ravine section and will soon turn into the next ravine which looks totally different. You go from mature hardwood forest to cedar forest that looks like it's on the West Coast. Extending the trail through this next section should be a lot easier since we won't have many stumps to pull or buckthorn to battle.

Follow along at AlmonteOutdoors.ca. We'll be organizing a trailwork day in the fall once temperatures drop a bit. The plan is to push all the way through to the Mill of Kintail this season, so we can ride our fat bikes in the snow on an exclusive 20+ km return route of single track.

In somewhat related news, my buddy Phil and I recently spent three days riding at Kingdom Trails in East Burke, Vermont. Amazing single track and well worth the trek. The Tallboy performed beautifully and we rode 100+ km and 2400m of elevation gain in the 12 hours of technical riding we did. Good food and beer too. When I have more time, I'll post some pics and vids. There's a group of us going again on September 13-15, so drop me a line if you can meet us there.

RotopaX fuel cell

As luck would have it, on the day I ordered my K60 Scouts and a RotopaX can, I ran out of gas while racing home from trying to grab a photo after a storm. There were two gas stations along the route and I figured I could refuel at either of them on the way back. However, when I discovered the first station was closed already at 8:00, my low fuel light came on with about 40km to go. The next station was also closed! Fortunately, a kind soul saw me at the now-dark gas station and offered to get me some gas from a can. A few minutes and a litre later, I had enough fuel to make it the last 20 km home. I probably could've made it home on the remaining gas, but it was dark, the road had no traffic, and I'd forgotten my cell phone at home.

Which brings me back to the RotopaX. The 1-gallon (3.8L) module is by coincidence almost exactly the same size (9.5" x 13.5" x 3") as my homebrew rack. The next size up is 1.75 gallons (6.6L), at 14" x 15" x 3.5". While that would still fit on my rack, the overhang would interfere with attaching bungies etc., and for my needs the capacity is slightly overkill. An extra 5L is about ideal for the distances I typically reach from gas stations (hours of opening notwithstanding). So I opted for the 1-gallon can, and may consider making a larger rack sometime to accommodate the 1.75 gal can and other potential luggage refinements.


The standard mount is ordered separately and includes a variety of mounting hardware. However, none of it enabled bolting the mount from the top, which I wanted to do so it could be removed quickly and easily without reaching under (or detaching) the rack. Since the mount stands so high in the middle of the rack, it's really in the way of using the rack for a tailbag or anything else that doesn't have a large hole in the middle.

Of course, there were no off-the-shelf metric cap bolts available that were long enough to pass through the mount and into the rack. My solution was to countersink the bolt holes in the mount. This would be a piece of cake with an end mill--which I didn't have, or the milling machine to use it. The four-jaw chuck on my lathe came in handy and with some dodgy machining I was able to countersink some respectable flat-bottomed holes that fit the 50mm M6 cap screws I had.


The mounting holes in the rack then needed to be threaded for M6. Since the rack is only 6mm 6061 aluminum, I didn't think it would withstand a whole lot of abuse from the bolts whenever I attached and removed the RotopaX mount. It would be a real nuisance if the threads stripped out while riding. My solution here was to tap the holes with a Helicoil-style M6 insert which would at least provide some stainless steel wear surface for the mounting bolts (tightened with blue Loctite). The Helicoil inserts protrude slightly below the rack, but it's nothing serious. There are some press-in nuts that may work better in this application, but my local fastener supplier only had plain steel options which would corrode quickly. I'll have to pore through my catalogues for a better option.


Anyway, the can fits really well and ride performance is not noticeably affected. It's a pretty secure system. Unfortunately, now I can't mount my tail bag. To solve that problem, I'm playing around with a folding aluminum panel concept that can flip up over the RotopaX, has slots to mount the bags straps, and can be quickly removed without tools. It can be unlatched and swung out of the way to access the can, or removed altogether in seconds. By making it out of aluminum (probably 3-4mm 6061), it'll provide a solid base for the tail bag, additional protection for the can, and additional mounting points for bungies, etc. Eventually I'll have to revise my rack design to accommodate all these tweaks and eliminate the need for certain hardware. That'll be a winter project!


Sunday, August 18, 2013

Heidenau K60 Scout - front and rear

Anyone who has tried almost any alternative to the stock Trailwings on the WR250R will probably agree that these are dreadful tires. What, exactly, makes them such a poster child of mediocrity is hard to say. Certainly the knob pattern and shape looks reasonable enough for modest dual-sporting applications. But they don't stick particularly well to asphalt or concrete, they slide in the mud, and they have a vague, wandering feel on gravel. If they were a colour, they'd be beige. Do yourself a favour and replace your Trailwings with something else.


In fact, doing just that has been on my to-do list for the WR. However, I was hoping to squeeze the rest of the season out of the TW's while I decided between going with a more aggressive knobby like the D606, or a more 50/50 tire that, realistically, is probably better suited to the actual riding I'm finding myself doing lately. More often than not I'm on 50/50 gravel roads and pavement either for an entire ride, or for about half of a longer ride out to the trails. When my rear tire proved too worn after 7500km of service, I finally sprung for the K60's since they've had good reviews in the usual places for my kind of riding.

Choosing sizes was not straightforward because Heidenau doesn't make a direct replacement for the OE Trailwing size. The closest match I found is a 90/90-21 for the front, and 4.00-18 for the rear. Just to confuse matters, some dealers don't have the K60 Scout model in stock. They only offer the original K60 (non-Scout) version which I believe comes in a different size range. Otherwise, the main difference I could see between the versions is that the Scout incorporates more of a central ridge in the tread. But just to confuse matters further, Heidenau changes the tread pattern depending on size! So all I can say is that I ordered the sizes above from A Vicious Cycle and they fit just fine on my WR250R. You can see from the photo just how different the shape and size of the rear tire is compared to the (worn) Trailwing!


One other thing is that A Vicious Cycle told me they only had the K60 Scout model available for the front, and that the rear would be the original K60 (non-Scout) model. However the rear tire I received has "Scout" on the sidewall and it seems to match the tread pattern of the Scout model on the Heidenau site (the 4.00 size lacks the central rib). Seems reasonable that I in fact have Scouts front and rear.

Dismounting the Trailwings was epic, as the sweat-spotted floor attests. Wear gloves if you value your knuckles. Mounting the K60's was relatively straightforward, and the rear was surprisingly much faster than the front. Baby powder make a great mounting lubricant: apply it liberally to the inside of the tire and all around the tubes and rim. This is an old cycling trick. It creates a lot less mess than using soapy water, and it allows the inner tube to settle into the tire easily. It's slippery enough that you can seat the bead with a hand pump. Any excess will wash off. Bonus is your bike smells baby-fresh when you're done.


Note that according to Heidenau, two red dots on the sidewall indicates the slightly heavier part of the tire. (If there's just one red dot, it's even heavier which seems counter-intuitive.) I positioned the dots opposite from the valve stem and this rode fine with no excessive vibration.

So how do they feel? An initial ride on a mix of town asphalt and hard-packed gravel roads showed a responsive, stable, and predictable feel. Particularly on loose gravel and uneven surfaces, I found the Scouts tracked much better and didn't wash out or skip around compared to the TW's. Cornering felt good, and the more rounded tire profile gave a faster turn-in. I'll have to get used to that. Overall my WR feels like a new bike. The larger diameter rubber may be an important factor in that regard: it smooths acceleration and bumps without giving a noticeable loss of zip--much like moving to a 29er mountain bike. I don't expect stellar mud performance, but that's not the goal anyway. Gravel performance is probably the most important factor in my riding.

I'm curious to see how these tires perform once they've broken in a bit. Stay tuned for an update.

Tuesday, August 13, 2013

Tail bag for the WR250R

Not having a tail bag has been a pain in the rear (so to speak) on numerous occasions. Various bag options I've checked out online all seemed to be lacking something, were out of stock, or cost too much. It then occurred to me that bicycle tail bags might be a good alternative. Indeed they are--and they're much cheaper! MEC and Bushtukah in Ottawa have some good options at about half or a third the price of comparable bags aimed at motorcyclists. However, being designed for a bicycle, they tend to be narrower than motorbike tail bags. I figured this was a reasonable tradeoff for the lower price and lighter weight. Besides, the rear subframe on the WR can't exactly handle a lot of weight anyway, and a narrower bag is less likely to snag on underbrush or tear off if (when) I hit the rhubarb.


So I picked up a Vaude Silkroad (large) from Bushtukah for $60. There were insulated lunch-style bags for $30 but I preferred the features of the Vaude: rain cover, side pockets that didn't fold down below the rack (they'd get in the way on a motorbike), internal zippered pockets, and simple Velcro strap attachment. Not sure about the water bottle holder. I'll try it out but may end up cutting it off if it proves to be more of a nuisance. The stitching will be easy to remove with a seam ripper, without affecting the integrity of the rest of the bag.


The challenge was how to mount this bag to my homemade rack. Unfortunately, the slots I'd originally cut in the rack didn't align with the strap attachments points on this narrow bag, so I needed to devise a new attachment method. I considered sewing new straps, but this was more work than I wanted to undertake and besides, I wanted to work with metal!

Some leftover stainless steel sheet from the face of our old dishwasher (I knew this would come in handy one day!) provided the basis for some simple clips that I bolted to new holes drilled in the rack. The sheet was just thin enough that I could shear it by hand, but sturdy enough that it is unlikely to snap. The slots were cut by first drilling a hole, then filing it long with a rattail file. This only took a few minutes for each clip and gave a pretty straight and smooth slot. A quick cleanup with files and emery cloth removed all burrs.


Then I bent up the end of each clip to make it easier to pass the strap through. A single 5mm bolt with Nyloc nut holds each clip in place. The bolts are located outboard for two reasons: first, it's easier to reach the hardware without removing the rack; second, so any vibration of the bag will tend to pull on the clip and reduce the risk of metal fatigue. The strap itself is more likely to wear through long before the clips break. I may slide a small length of split tubing over the friction point of each clip under the strap, to reduce wear.


One problem with my approach will be how to mount the bag on top of a RotoPax fuel cell that I'm planning to add. The clips are fairly flush to the rack (although the bolt heads stick up a bit), so I can probably leave them in place under the cell. However, I'll need to come up with another way to attach the rack on top. I have a few ideas for that. I may also sew some additional Velcro onto the bag sides to hold the flapping end of the straps. As it is, there's about 1.5" of Velcro sticking at each location. That's plenty strong against shearing forces.


Lots of room inside for a full-size SLR camera, 1.5L bottle, and other items.


The rain cover is nice and bright. It's big enough that it encloses the rack itself, and is therefore much more secure than if it went over only the bag.